


Absolutely my favorite airframe!
Text, photos and video by Tom Hintz
Posted–4-28-2015
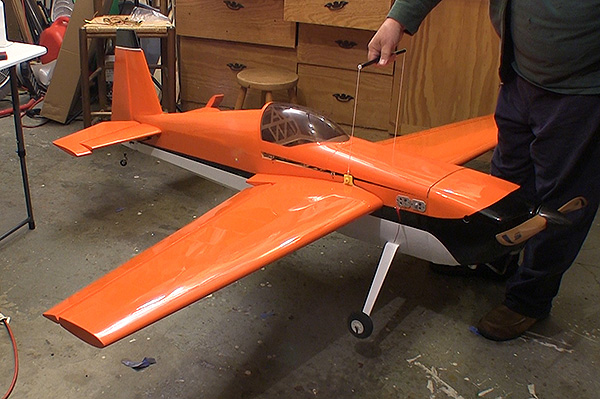
The Edge 540 has always been a great looking airplane to me, both the full scale aerobatic superstar and the uber-aerobatic RC version. In particular the orange version from Aeroworks has been the target of my obsession. Aeroworks also offers this classic model in the traditional International racing colors. The classic lines of the original Edge 540 are appealing but it is the ferocious aerobatic/3D capabilities of the Aeroworks 50cc Edge 540 ARF that really jack up my anticipation. This one is going to be fun! (Like any RC plane isn’t….)
The Aeroworks 50cc Edge 540 ARF has an 88” wingspan with 1395 sq. in of wing area. The fuselage from the rudder to the tip of the (3-1/2” recommended) spinner is 81-1/2” long. Rudder height, on the tail wheel is 24-1/2”. The classically-shaped cowl is 10” wide which means you can slip popular twin cylinder engines in there and still have most of the cowl! The Aeroworks 50cc Edge 540 ARF has a flying weight of 17 to 18-lbs with a 50 to 60cc engine.
The Aeroworks 50cc Edge 540 ARF airframe is typical Aeroworks in that it is light, rigid and strong. These planes are all laser cut and jig assembled for a level of straightness that was super difficult to obtain in the old days of building them yourself. It is covered with Ultracote™ and you get extra squares of covering in the colors used for small repairs. The fiberglass cowl uses an internal plywood ring that eliminates having to fit it while hiding the fasteners for a cleaner look. The airframe is canister and tuned pipe ready.
The entire engine box is fuel proofed and you get templates for several popular engines. My DLE61 was not included but I printed a template from the DLE site and used the laser-burned cross hairs on the engine box to align it perfectly for drilling. You even get a bag of ¼”-thick machined motor spacers that make hitting the 6-5/8” cowl to firewall distance simple. I actually added roughly 3/16” to be sure the spinner back plate clears all the way around. You even get fuel and smoke tanks in the kit.
Everything but the rudder is pre hinged to speed assembly. The Aeroworks 50cc Edge 540 ARF uses aluminum landing gear, plus the wing and tail feather stabilizer tubes are made from 6061 T-6 Anodized aluminum.
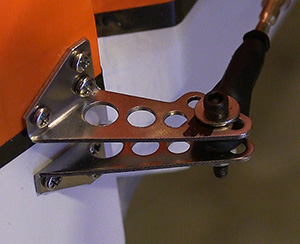
As is the Aeroworks practice you get a full hardware package that includes all good stuff. The pull-pull system is easy to install because it uses high end cable and 4-40 hardware. All of the pushrods are true turnbuckle which makes dialing in the Aeroworks 50cc Edge 540 ARF during setup simple and fast. To further enhance setup Aeroworks includes a throw meter and rudder deflection gauge.
One of the things that makes Aeroworks fly so well is that they include their CG Buddy in many of their kits, including the Aeroworks 50cc Edge 540 ARF. This simple device makes it easy for a single person to balance a giant scale plane accurately by themselves. If you have CG –related problems with this plane you simply did not use the CG Buddy or disregarded what it told you.
I spent a bit over an hour carefully going over all seams with my iron. I couldn’t see any that looked loose but taking the time now can save much bigger issues later when a loose edge gets fuel and oil under it. If you have a smoke system all bets are off in terms of the covering surviving long unless you are quick and thorough cleaning that stuff up. I also re shrunk all of the covering with my hot air gun. You still get wrinkles on sunny days but they seem to be much smaller and go away faster with the heat gun.
I put the landing gear on early so I can set the model out of the way when other things need working on. When it is on the gear it is way harder for it to fall off of something. I also started installing the HiTec HS-7954SH, 400+ ounce servos I am using on each aileron, each elevator and the rudder. These are brutes, they are fast and I have had great luck with them. I like having extra power at the servo rather than marginal or not enough.
Aeroworks supplies high end hardware with their kits and I started installing that next. You get double sided, steel control horns that get screwed into pre-drilled holes in all of the control surfaces. I also assembled the true turnbuckle linkages that mate with 4-40 sized ball links, 4-40 bolts, tapered standoffs that keep the linkage from binding on the servo arms and lock nuts. There isn’t a bit of overkill in this system if you want to throw a plane around the sky. You can see how other companies’ cheap out with 2-56 hardware and less connecting pieces. Aeroworks simply does not do that.
I also had to epoxy the rudder in place, the only hinging needed on this Aeroworks 50cc Edge 540 ARF. They call this a Quick Build model for a reason. I still like to take my time to get everything right but Aeroworks really does a lot for you.
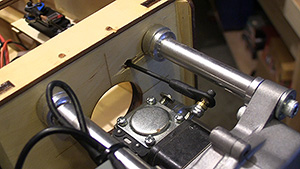
As mentioned earlier I mounted the motor and used an included spacer under each standoff to get the prop out in front of the cowl almost ¼”. I also added a wrap around Pitt’s style muffler that did not get along well with a bunch of the cowl. If you are building this plane consider the compact version of the Pitts mufflers…… I did get it cut but had to remove a section of the plywood ring between the bottom cowl mounts and made a notch in the top portion of the same ring to sneak the nose of the crank through to flip the cowl down into place. I also added a hole in the side of the cowl for adjusting the carb. I know some people hate an extra hole in a cowl but my 60-something eyes have issues looking in there in the daylight so I need the help. Besides, it’s my plane.
Aeroworks even gives you a very solid 4-40 rod and rod ends for the throttle and another that can be used for a choke servo. One threaded end of the rod gets soldered in place but it makes a nice throttle linkage with zero play in it. I even tapped the throttle arm on the DLE carb for 4-40 and put an insert nut behind it. Aeroworks also provides servo mount boxes that you can glue in where you want to further simplify those systems.
With the wings and canopy loosely assembled I added the CG Buddy and gently lifted the Aeroworks 50cc Edge 540 ARF off of the ground. I had hit the component placement just right and it hung flat. I set the plane down and lifted it a few more times to be sure it continued to hang level.
Now I could finalize the installation of the radio gear and batteries, go through the setup of the control surfaces and then check the CG one more time to be sure it did not move. I will probably run the DLE61 a couple times to check the throttle operation and to see how the engine runs with the cowl in place. Sometimes a bit of tuning is needed.
Then the Aeroworks 50cc Edge 540 ARF is ready to fly. I will clean it up again and add the stickers. The day before the maiden flight I will charge it up to be sure I am ready for several flights!
I had anticipated doing this build story in two or three segments but the Aeroworks 50cc Edge 540 ARF is a true Quick-Build model and the assembly went much quicker than I anticipated. Rather than try to draw this out I am including everything in this segment and the next one will be the maiden and initial flights. I like it when I get more time at the field!
See the Aeroworks 50cc Edge 540 ARF product page – Click Here Have a comment on this review? –Email Me!