


Clean it first!
Text, photos and video by Tom Hintz
Posted – 9-28-2016
One of the things I really appreciated when I returned to RC flying was the ARF (almost ready to fly) airplanes. Not only did they come covered, they came covered way better than I could have done. However, we still have to take care of the covering, usually starting by re shrinking it when we remove the components from the box that carried it to us from the other side of the world. Get used to it, this won’t be the last time the covering loosens up.
What follows here is my take on keeping my covering looking good. Barring that, looking presentable. Nobody will confuse me with a covering wizard but I do pay attention to what others do, read instructions and use what worked for me in the past.
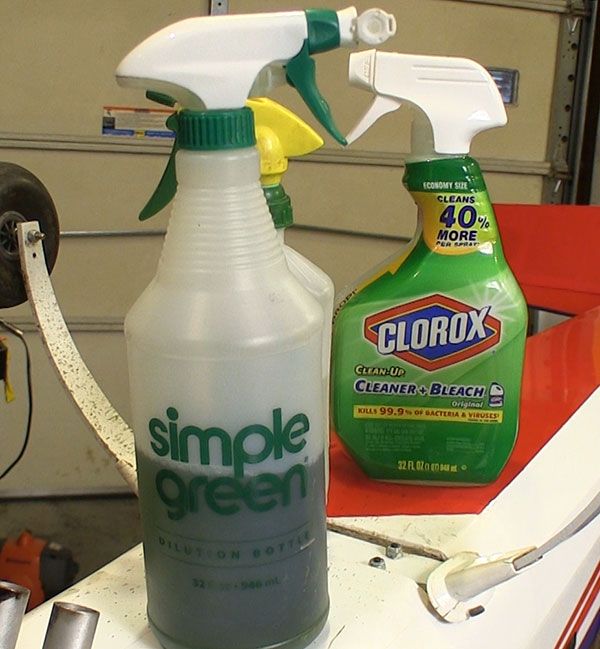
Once we start flying a new plane we have to start cleaning the covering. I have tried all sort of cleaners and concoctions but nothing seems to work better than Simple Green. I buy the bulk jug and dilute the concentrate by about 50% with plain water.
Part of why the Simple Green works for me might be due to my use of Redline Synthetic racing oil in a 50:1 mixture with regular gas. Whatever the reason, the Simple Green does a good job of getting the fuel/oil residue off of my planes’ covering.
If the fuel/oil residues on the plane is heavy I will go over each area twice to be sure I get the thin film of oil that often survives the first cleaning pass. I also use a lot of paper towels, changing them often to avoid spreading the oil in the towel back onto the plane.
I start cleaning with the fuselage upside down. The bottom is always the most contaminated and starting there helps prevent smearing it onto just-cleaned surfaces when I when I work my way to the top side areas. Most of the covering seams are wrapped towards the bottom of the plane so this is a good time to watch for sections of those seams that are loosening up.
I go over the seams after cleaning.
Whenever we find loose covering it pays to follow it to the seam. If we try shrinking a loose section with a loose seam the problem instantly gets way worse. Fix the seam first, then shrink the loose area and you can’t tell the repair was made.
First we have to clean the open seam, both the top covering and the area it is sealed to. We have to get all of the oil residue off to give the remaining covering adhesive the best chance of sticking. I use plain alcohol scrubbed in with a paper towel and repeat this cleaning two or three times with a new piece of paper towel each time to prevent re introducing oil to the seam.
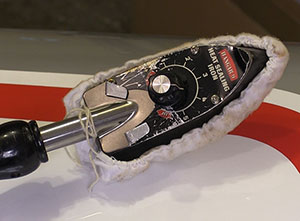
I use my covering iron set just above half of its heat range to re stick a loose seam. Remember that the adhesive on most coverings is designed to stick at substantially lower temperatures than it takes to shrink it. I always use a covering sock over my iron to help protect the surface of the covering. Rubbing the covering iron in a direction that closes the seam helps keep it tighter and puts it back to its original position or close to it. Sometimes using a piece of paper towel soaked with water to press the freshly sealed seam closed can make for a better job, particularly where the seam goes over some form of contour.
Recently I have been applying Monokote Trim Sealer to a repaired seam. Just wet a folded paper towel with the Trim Sealer and wipe it along the seam, then let it dry. This sealer is made for applying graphics made from covering but it appears to help seal up seams and keeps them sealed.
When wrinkles develop in the larger sections of covering I use my heat gun, on the high setting to shrink them out. Naturally you have to be careful with a heat gun as it can melt through the covering if you hold it in one place too long. I also find that starting at one end of a wing or fuselage and using a sweeping motion to work my way to the other end works best. I can keep moving and avoid over heating any one part of the covering.
Very often a wrinkle will develop at one end of a bay between wing ribs or other structure. If we start at the other end of that section to shrink all of the covering as we move across the section, the wrinkle comes out sooner with less shrinking just in the spot where the wrinkle first appeared. As we shrink the whole section the covering is pulling tighter over the whole span and that makes it much easier to get the film flat without overheating the seam at the edge of the area where we are working.
A small pin hole cures the puffys.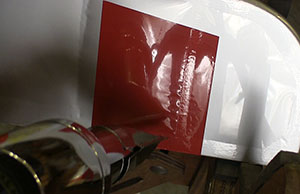
Many larger control surfaces are built up structures that can become sealed all the way around. Very often when we try to snug up the covering on these pieces the area between the structure can look like pillows as the heated air inside expands the covering like a balloon. Covering manufacturers tell you to use a small pin and poke a hole in the underside of the bay to let the air escape. I usually try to shrink the wrinkles out and then let the piece sit for a few minutes to see if the covering draws tight as it cools. If the puffy appearance remains I will poke a pin hole in the covering in each of the areas that puff up and re-shrink it. In most cases that gets rid of that puffy appearance.
Another frustrating problem with covering is it gassing up and forming bubbles over sheeted areas. Top Flight makes a tool called the “Woodpecker” that is designed to make a bunch of little holes in the sheeting so when covered the air and gasses have someplace to go and that usually eliminates the bubbles. Unfortunately, the folks building these ARF’s don’t know about that tool and don’t prep the sheeted areas for covering. You can shrink the area with the heat gun and poke one end of a bubble with the pin. If it is a sharp, small diameter pin the covering usually shrinks down nicely and the pin hole becomes all but invisible. When I have to make a pin hole like this I will apply a film of the Trim Sealer discussed earlier to help seal that up.
When all of the covering is clean and tightened up I get out my Eagle One Wax-As-U-Dry wax and go over the entire plane to shine it up and protect the covering. Fuel and oil residue clean up much easier from a waxed model and the model itself just looks way better with that wet look shine all over it. Since changing to the Eagle One Wax-As-U-Dry wax I am not finding nearly as many loose edges on graphics hopefully because the wax is sealing the edges up a bit more. Whatever is happening it looks better.
Taking a little time now and then to go over the covering on out models can save a bunch of work and even money down the road when we don’t have to rip it all off and start over again. With the acceptance of ARF models, many of us don’t know how to recover an airplane making this bit of maintenance even more important. I know that the sun and the passing or time will cause the covering to loosen up here and there but I know that I can deal with it and make my plane look good in just a few minutes before going to the flying field.
Have a comment on this story? –Email Me!