


This conversion is cheap, simple and should have been done at the factory.
Text and photos by Tom Hintz
Posted – 11-1-2015
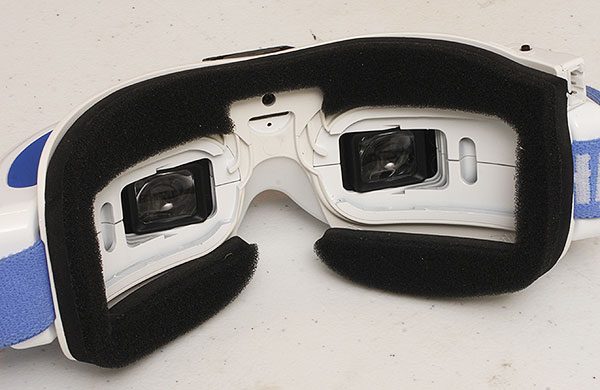
While the FatShark Dominator V2 FPV headset has a huge following in the FPV world there is virtually the same number of people that are less than giddy about the rubber eye cups and lack of ventilation of the lens area on the V2 model. The biggest physical change with the V3 is the faceplate that dramatically expands the contact areas with the face that enables a whole new level of comfort and stability of the headset. They also added a small fan that directs air across the lenses within the FatShark Dominator V3. V2 owners can now take advantage of these design changes with the Fat Shark Faceplate Conversion.
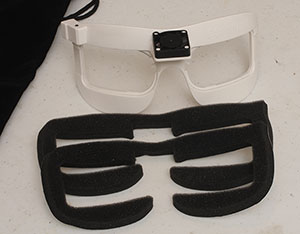
The Fat Shark Faceplate Conversion appears to be identical to the faceplate that comes installed on the new V3 Dominators. Along with the faceplate itself you get two foam rubber “gaskets” that go around the outer edges of the faceplate. One foam piece is soft through is thickness while the other and seemingly favored one has a firm layer of foam beneath the softer outer layer. This combination foam piece seems to give the majority of users the feel that they like, me included.
The Fat Shark Faceplate Conversion comes with a fan mounted above the bridge of the nose that blows a small but consistent amount of air down into the Fat Shark Faceplate Conversion and through “channels” that direct that flow across the lenses to get rid of condensation, usually described as fogging.
Fat Shark appears to be addicted to carry cases and they include a rather fancy felt-looking bag with the Fat Shark Faceplate Conversion. I suspect they do this because the V2 headset with the Fat Shark Faceplate Conversion installed might not fit in the case that came with the V2 models. I don’t have the V2 case to check but I see people buying the V3 case, probably for this reason.
I used the thicker foam pad as it stands
to reason i is going to press down.
Installing the Fat Shark Faceplate Conversion can’t be much easier. You remove the rubber eye cups and snap the Fat Shark Faceplate Conversion onto the V2 body using the same mounts the rubber eye cups were removed from.
Then you have to choose which of the foam pieces you are going to install. Remove the paper protective covering from the adhesive side and carefully stick the foam piece to the faceplate. That really is it. I am not sure how hard it is to remove the Fat Shark Faceplate from my V3 and I am not going to yank on it to find out.
There are no adjustments with the Fat Shark Faceplate Conversion outside of changing the tension on the elastic band for some folks. The Fat Shark Faceplate Conversion fits so well the actual tension of the elastic band is less important. You just need it tight enough to hold the headset in place but it is so stable with its enlarged footprint we do not need it very tight.
The ventilation fan is turned on by a button at the top right of the Fat Shark Faceplate Conversion. Power comes from the balance connector on the battery pace that is plugged into the Fat Shark Faceplate Conversion above the headset power plug.
There are no instructions included with the Fat Shark Faceplate Conversion so we are working on word of mouth here. I am told that each time you press the On button the fan runs for another 8 minutes. Obviously one push is going to do it for most quad racers and most general FPV users. Pushing the button a second time will not turn it off, it just makes the fan run longer. When you are done with the flight, unplug the headset battery and that ends the ventilation fans work as well.
The only knock against the Fat Shark Faceplate Conversion that I have heard is that for some people exterior light gets in around the opening shaped to fit around the bridge of the nose. If I am looking for that light I can see something there occasionally but for me it is not an issue.
The improved face contact is so dramatic it is hard to concentrate on anything but flying. The comfort level is way up and losing the rubber eye cups means that your eyes and surrounding muscles can relax which seems to make it easier to focus on the images in front of you.
I have not been able to notice any measurable increase in battery usage with the addition of the ventilation fan. It is a small fan and we are not looking for high air speeds so battery draw by the fan is negligible. I can say that I forgot to turn the fan on once and the lenses fogged up. The rest of the day I turned the fan on when I plugged the battery into the headset and that ended fogging issues for the rest of the day.
This little fan makes these goggles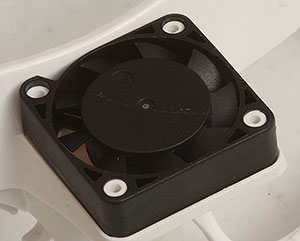
usable.
The Fat Shark Faceplate Conversion is a real live improvement piece for FatShark Dominator V2 owners. There are no bells and whistles but there is lots of comfort and stability. With a street price of $24.95 (11-1-2015) this may well be the cheapest legitimate improvement in the FPV world as we know it.
If you own a FatShark Dominator V2 you need the Fat Shark Faceplate Conversion. It is just that simple. If you are unhappy at all with how your V2 fits your face get this conversion and quit whining.
Have a comment on this Review? –Email Me!