|
|||||


FlyingRC.net is a
Veteran-Owned site.

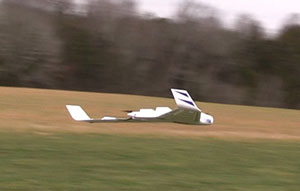 |
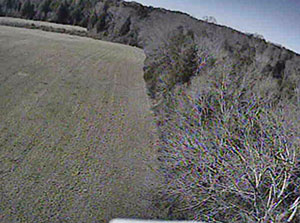
| The Opterra™ 2m Wing is very stable without wind and surprisingly quick in a full glide so practice is needed to figure out how far out to get off the gas for landing! Click image to enlarge |
Opterra™ 2m Wing
My fun to fly camera platform
Text, photos and video by Tom Hintz
Flight video by Clark Ponthier
Launches and master buddy box – Mike Basmajian
Posted – 2-20-2017
I had been looking for an airborne camera platform that would help in the creation of video that supports the Reviews and How-To stories I produce for FlyingRC.net. I happened upon an ad for the Opterra™ 2m Wing BNF Basic with AS3X® (EFL11150) from Horizon Hobby and thought that it appeared to be the perfect, nearly ready-made solution. The fact that it had a projected assembly time of 1 hour, requires virtually no maintenance and breaks down for easy transport didn’t hurt anything.
The Basics
The Opterra™ 2m Wing has a wingspan of 78.3 in (1989 mm) and a total wing area of 1033 sq in (66.6 sq mm). The overall length of 40.8 in (1035.6mm) meant it could be transported easily in my trailer even when fully assembled. The detachable outer wing panels and wing tips allow for transport in virtually any car. The total weight of 67oz and 10 size electric motor means it flies on 3S Lipos with capacities of 2200 to 3200 mAh with a general flight time of 7 to 9 minutes depending on throttle usage.
The Opterra™ 2m Wing is made from carbon-reinforced, hollow-core Z-Foam™ material so durability should be a non-issue unless the pilot somehow manages to fail to miss the ground, at speed. Modern foam can often be easily repaired so even a case of the “stupids” should not be terminal. The light weight combined with things like Vortex generators promise impressive control response throughout the flight envelope. This is most noticeable in the solid control you have a ridiculously slow landing speeds.
 |
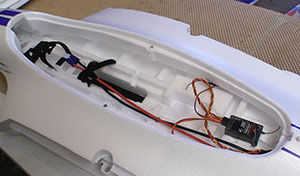 |
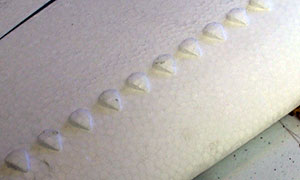
| The wings have these vortex generators (left) along the top and bottom near the leading edge to help keep the air flow over the control surfaces. There is a ton of room inside the fuselage (right) for FPV gear and maybe your lunch! Click images to enlarge |
|
Power comes from a brushless 10 BL motor and a folding pusher prop. The lack of landing gear means just one less way to injure the airframe. A plane like this has no business being on wheels so I see this as a big plus. There is a catch though so be sure to read the Launch section below.
The Opterra™ 2m Wing reviewed here is the BNF (bind and fly) Basic version that comes with a Spektrum 6 channel AS3X® receiver with SAFE® Select technology already installed. It also has digital metal-geared servos that should have a long life under the light loads a plane like this will generate.
Camera Capabilities
While the Opterra™ 2m Wing is undoubtedly fun to fly, for my purposes the built-in camera capabilities are what caught my attention. It is set up for easy conversion to a FPV machine and should be great for that purpose as well because of its wide speed range and considerable inherent stability.
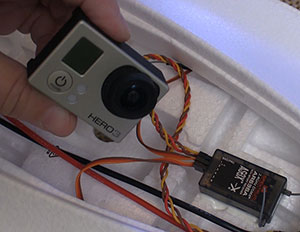
Of particular interest to me was the GoPro-specific mounting positions that let me choose from shooting high quality video straight out of the nose or straight down from the belly of the Opterra™ 2m Wing. The speed and maneuverability of the Opterra™ 2m Wing should make following many planes and helicopters rather easy.
The straight down GoPro position has the camera’s long axis following the centerline of the fuselage so you are essentially shooting video sideways in relation to the direction of flight. This may have some utility for some people but for my purposes the molded in hole in the bottom will serve as an air dump to help keep fresh air through the fuselage.
 |
 |
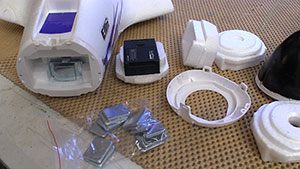
| The nose has several inserts (left) for various camera options including a GoPro. Thee is a molded-in GoPro mount in the belly for downward shooting video but the camera is going sideways while making this video. Click images to enlarge |
|
The nose section has a few different pieces of foam that can be used to accommodate a few different camera styles. Here again I was most interested in the GoPro adapter which does fit the camera very well and holds it securely in the plane IF you use the two metal screws that hold the outer ring in place in addition to the molded in clip. There is no good way of starting and stopping the GoPro once it is installed unless you turn on the infrared feature and use a smart phone to start and stop it. I did drill another hole in through the side of the Opterra™ 2m Wing fuse that lets me use a small screwdriver to push the infrared button with the camera installed and we will be testing how easy this actually is during future flights.
There is a relatively flat spot on top of the nose where an FPV or other camera can be installed. This is a great place for a Mobius and similar cams if you trust hook and lop material to hold onto it during the flight.
Launching
It is important to note that the instructions for the Opterra™ 2m Wing describe the hand launching procedure. There is no other launch method shown or described in the manual and since there are no wheels (optional or otherwise) and no facility for tow launching. We are left with the hand launch as the only way to get this model into the air. As you will see a bit later, I totally disagree with this.
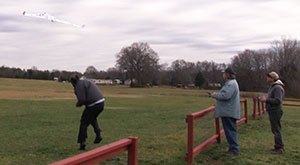
Because this is a pusher prop and I have heard the bloody-fingers history this kind of configuration has I read the “Hand Launch” instruction in the Opterra™ 2m Wing manual twice. At the field, we enlisted the help of an experienced RC’r to toss the Opterra™ 2m Wing into the air, something he does with various planes all of the time. I gave it one third to half throttle even though the instructions call for full throttle. The Opterra™ 2m Wing motor pulls plenty hard at half throttle. He tossed it into the wind, a bit nose up per the instructions but as the Opterra™ 2m Wing flew away I heard the sickening “tick” when prop met fingers.
The cuts were bad enough that he wound up in an Urgent Care center to get patched up. Thankfully he is going to be OK and was even back at the field a couple hours later flying his own planes. That was great to see but I was either going to find a safer way to launch the Opterra™ 2m Wing or it was going in the trash barrel. Flying model airplanes, no matter how much fun, should never have us thinking someone might be about to get hurt.
 |
 |
| The first hand launch, (left) following the instructions in the manual resulted in a couple of nasty-looking cuts. From that launch on we hand launched the Opterra™ 2m Wing (right) with no power at all, then rolled on the motor after it left the guy launching it. We have had zero problems with the no-power launches and it is way safer! Click images to enlarge |
|
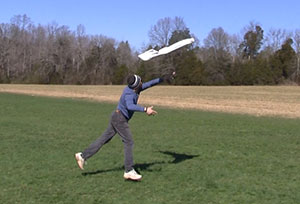
We tried an impromptu discus type launch with way less than desired results. After some quick repairs the next morning I brought the Opterra™ 2m Wing back to the field. I had noticed that the Opterra™ 2m Wing floats like a glider with the power off, even at low speeds so I decided that we needed to try launching it with no power at all. Surely the launching solution could not be as simple as just throw it in the air…..
Mike simply threw the Opterra™ 2m Wing into the air after a few steps forward with no power at all. I waited until I could clearly see that the prop was fully clear of Mike ‘s hand and then rolled on the power. The Opterra™ 2m Wing flew away without a hint of losing stability. Having done this power off launch many times now it proves to me that there is no reason to try and launch this pusher with the motor spinning.
I know that E-flite must have a reason for recommending power-on launches but I simply cannot justify that. Just tossing the Opterra™ 2m Wing into the air is totally safe for the launcher and because of the tremendous low-speed stability the plane is not in any danger either. Throw it into the wind, slightly nose up, wait to see clearance between your launchers hand and the Opterra™ 2m Wing and then roll on the gas. It can’t be much easier or safer.
In the Air
Throughout the initial flights we had winds from 10 to 15 mph with gusts and higher winds speeds above 100 feet or so. What all this proves is that the Opterra™ 2m Wing can in fact fly in the wind but it does not like it much. I found myself constantly tripped up by the no-rudder configuration so cross wind landings could get a bit difficult as the wind pushed the Opterra™ 2m Wing towards one edge of the runway or the other. That said, it never felt out of control but you can readily tell this is a large, very light wing that bounces around in the wind.
The roll rate on the Opterra™ 2m Wing is understandably slow. Turning a 2M wing though a full roll just takes a little while. I did increase the “aileron” throw to as much as I could get but that did not make a substantial change in the actual roll rate. It did seem to make the ailerons feel more positive when I made stick inputs. I’m not counting on the Opterra™ 2m Wing being an aerobatic machine but rather a platform from which to learn FPV (first person view) flying and to carry cameras to hopefully get some unique footage for reviews and such. In that, I expect the Opterra™ 2m Wing will perform very well.
 |
 |
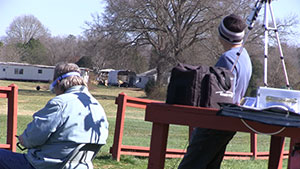
| we decided to try flying the Opterra™ 2m Wing using an FPV cam. (left) Mike, standing to my right is on the buddy box in case I get lost. The Opterra™ 2m Wing is easy to fly in FPV mode though with the wind we had it does jump around quite a bit. Practice is all that is necessary to better handle it. Click images to enlarge |
|
I use 3-cell, 11.V, 3300mAh batteries and am getting a solid 7 minutes of mixed throttle flight time. When I check the packs before charging I am seeing 30 to 40% of the battery capacity remaining after the flight. That flight time should give me plenty of opportunity to get the video shots I want or provide a nice time span for recreational flying.
The Opterra™ 2m Wing is very much a glider when the power is off and that extended glide capacity takes some getting used to when it comes time to land. I constantly found myself with too much airspeed and/or altitude on my early landing attempts. A good thing is how stable the Opterra™ 2m Wing is at these lower speeds. I found it very easy to gently push the nose down to get it closer to the runway before letting it settle in. I expect most of you will find the same thing and with a little practice figure out where is best to get off of the “gas” for landing on your runway.
Flying FPV
We have done several FPV flights with the Opterra™ 2m Wing now and it proves to be a good platform for that as well. We are flying it on a buddy box so that there is always someone on the master transmitter that is “line of sight” to take over if the goggle-equipped pilot on the slave transmitter gets in trouble or begins wandering away from the field. So far, we have not had to rescue the Opterra™ 2m Wing during FPV flights due largely to its gentle nature in the air and a clear field of vision through the FPV camera.
Conclusions
The Opterra™ 2m Wing is a slow-mover foamy with a huge flight envelope that should be fun for a large range of RC pilots. A 3D stunt machine it isn’t but if you enjoy lazy summer flights, alternating between power and gliding the Opterra™ 2m Wing just might be for you.
Video Tour |
|
The construction seems first rate with plenty of stiffness where it needs it. The ease of assembly and tear down make the Opterra™ 2m Wing ideal for getting to short fields in short cars. If there is a caveat it is that the finger bolts that secure the wing and wing tips need to be carried around in an old servo box of a plastic bag. I’d love to see a few extras of these critical fasteners in the kit.
I bought the Opterra™ 2m Wing used in this review for $229.99 (2-8-2017) which seems like short money to me for what you get. This is a good flying plane with lots of capabilities. The price gets even better because this really is bind and fly. You do have to buy batteries and Horizon does not send anyone out to charge your battery for you but if you can muddle through that, the Opterra™ 2m Wing is ready to fly.
Visit the Opterra™ 2m Wing product page – Click Here
Have a comment on this Review? –Email Me!
All Flyingrc.net written, photographic and drawn materials are property of and copyright by Tom Hintz and Flyingrc.net 2013-2020 Materials cannot be used in any way without the prior written permission of the owner.
Privacy Statement