


Robarts retracts for models are a wonder in technology. There is lot of experience
behind these units.
Text, photos and video by Tom Hintz
Flight video by Clark Ponthier
Posted - 3-27-2017
Some of you might remember my grand (but frightening) experiment with my then new Top Flite™ Giant P51D Mustang ARF where I used the stock wire main landing gear in response to viewer requests. That endeavor went off the tracks as soon as I tried to taxi the Top Flite™ Giant P51D Mustang ARF in the grass. It turns out that wire gear function way better as pogo sticks than landing gear. The wheels deflected in all directions which made take off’s and landings way more exciting than need be. I put the Top Flite™ Giant P51D Mustang ARF away and vowed it would not return to the air (or the runway) without decent landing gear. In the end, I got way better than “decent” landing gear, I got Robarts.
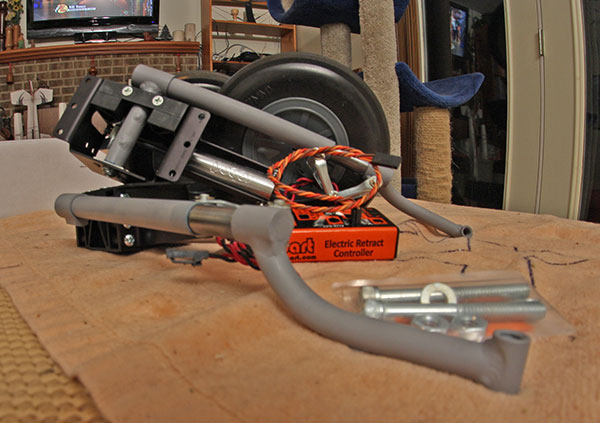
The Robart Top Flite P-51 Mustang Electric Main Retracts (#622-5E) are specifically designed for this model and its 5”-tall wheels which simplifies installation dramatically. I literally removed the wire gear and dropped the Robart electrics in their place. Since Top Flite installs the wheel wells at the factory getting the Robart Electric Retracts perfectly aligned is a quick, simple job that required very little modification.
The Robart Electric Retracts are made from aircraft grade aluminum and steel with clean machining, high-quality welding and finishing throughout. Something I really like about the Robart Electric Retracts is the positive lock at full up and full down. With all the built-in security, you can still easily adjust each strut for overall height and toe in to make sure your plane tracks perfectly.
Each retract features a functional 4130 chrome moly steel strut with an operational “knee” that helps cushion slightly “aggressive” landings or bumpy runways. While taxiing the Top Flite™ Giant P51D Mustang ARF I can see the wheels moving up and down in the strut which means less of the runway bump shock is being transmitted to the airframe.
The electric motors that power the Robart Electric Retracts shown here have something called an “amp out” feature. Say a wheel gets tweaked on takeoff and does not fit in the wheel well. When the wheel catches on the side of the opening, the motor senses the increased amp draw and shuts the motor off. But when you hit the switch to lower the gear the motor comes to life in its down mode like nothing happened. This is a very nice safety feature that works totally in the background but can literally save your plane.
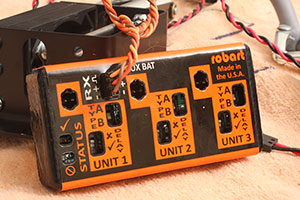
This very light box sends the signals to the
individual gear units. It also add a small
delay to one of the mains to make the
movement more realistic.
The Robart Electric Retracts come with their purpose-designed control box that lets you add delays to one or both retracts if you want. It also acts as a dispersal point so you have one lead coming from the receiver to the Robart Electric Retracts control which makes putting the wing on a warbird faster and a bit easier.
This control box is very light so CG is not impacted by where you put it. The lack of mass also makes it easier to secure the box with servo tape. I had one of these control boxes in my Top-Flite Giant Scale P47 Razorback and during the three days I flew at the 2016 Joe Nall at Triple Tree Aerodrome. Despite 90-some degree temperatures and the heat-absorbing dark green traditional warbird color, the box never moved.
People have asked me if there is a speed setting at the control box to regulate how quickly the wheels go up and down and there is not. The speed is very scale-looking and I suspect an engineering necessity to develop the power to extend and retract the strut and wheel assemblies reliably with a reasonably sized motor on the current available in our models. However, you can add a small delay at the control box to one or both wheels when that adds a bit of realism to your model.
In most warbird applications, you will need to add extensions to the retract cables to reach the control box without putting tension on the cables themselves or the connectors. The Robart Electric Retracts cables are heavy duty with a purpose designed locking plug so standard servo extensions won’t work. I like the Robart extensions because they are heavy duty which gives me peace of mind that a connection buried inside of the wing isn’t going to fall apart on me. Though the locking plugs are very secure I cover them as I do with all servo extension connections with shrink wrap just to be sure. Very often the shrink wrap also “smooth’s” that area of the cable a bit and makes pulling them through the wing structure a little easier.
Putting the wheels on the Robart Electric Retracts is fairly straight forward, sort of. There is very little difference in mounting the wheels included with the Top Flite™ Giant P51D Mustang ARF as opposed to the DuBro 5” Treaded Lite Wheels (DUB500TL) I use on planes of this size.
The axles included with the Robart Electric Retracts are about 0.247”-diameter so the wheels need to have a ¼”-diameter hole. This is close to a size on size fit but with a little grease on the axle they turn fine and will loosen up a bit with a little driving around the runway. The important thing is to drill the holes straight. I use a drill press because I am sure that I can’t get them straight by hand.
The Robart Electric Retracts designed for the Top Flite™ Giant P51D Mustang ARF have an offset leg and the wheels a little bit of a dish shape so we need to shim the wheels out enough so that they do not rub on the angled portion of the strut. Adding a few washers on the axle gave me the clearance I wanted. I look for at least 1/8” clearance between the tire and strut at the closest point. Even then I have noticed marks on the strut where the tire had deformed a bit and rubbed just a little bit. I have not had a wheel lock up from this small contact.
The bolt used as an axle threads through the strut and a nut is used from the other side to “jam” the axle to prevent it from loosening up. I use blue (removable) Loctite on the bolt threads and nut as having one of these wheels loosen up or worse, fall off is not a good thing.
When installing the axles (bolts) take your time to get them just tight enough so that the wheel can’t move in and out and there is just a touch of friction. This also will loosen up quickly with a little driving around on the runway. After a couple flights check the axles to be sure they remain secure and adjusted correctly. The wheels might need to be adjusted a time or two as they “seat” on the axle.
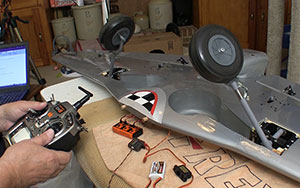
Modern Spektrum radios make setting
up the retracts simple and quick.
To get the Robart Electric Retracts into the wing we need to extend and retract them a time or two to get them fit correctly in the wheel wells. You can do this by installing the control box connected to the receiver in the plane but that can be a bit of a balancing act. I use an old receiver connected to a separate battery and switch and connect the control box to that. I bind that receiver setup to a “Retract” model in my spare transmitter so I can use it for any set of retracts I am installing.
This way I can run the Robart Electric Retracts up and down as I need with the wing sitting on the bench. It is way easier for me and prevents the inevitable “hangar rash” I develop when trying to balance the wing on the fuse while I make the adjustments to the retracts to get the fit in the wheel wells correct.
Installing the Robart Electric Retracts was almost simple as I expected. The retracts are sized to drop right in the existing cavity. Even the screw holes in the retract flange matches those in the wooden blocks used to mount the stock wire gear. I did add a drop of thin CA glue to each screw hole to toughen the threads. This is always a good idea that adds a bi of security to the installation.
I had left the strings that Top Flite installed for pulling the retract motor cables (with extensions) through the wing to the provided holes at the root. The narrow design of the Robart cable plugs along with the shrink tubing usually make pulling the cable through the wing structure much easier. However, with the wing halves joined to use the stock wire gear, pulling the cables through the structure was harder than normal. I think the biggest problem is that pulling the cables this way angles the cable toward the bottom of the wing so they catch on everything on the way to the exit hole. When you do this before joining the wing halves the string and cable are much straighter and the cable comes through far easier. My bad.
The Robart Electric Retracts need to be extended (wheels in place) to get them into the cavity in the wing. I get them installed, cables pulled through the wing but I leave the six mounting screws a little loose. Then I can retract the wheels and use shims to center the wheels in the wheel wells. With the wheels centered, tighten the mounting screws to lock the Robart Electric Retracts in place. Cycle the gear a few times to be sure the wheels really are centered and that there is no binding.
I had to modify one retract just a tad to get it to fit the wheel well. The screw and the screw hole diameters were almost identical so there was no play between the Robart Electric Retract mounting flange and the screws. The wheel contacted the front of the wheel well so I opened the screw holes just a tick (next drill size) and that gave me the adjustment room I needed. The modification was easy and added maybe 10 minutes to the installation.
I had to shim the wheel a bit to keep it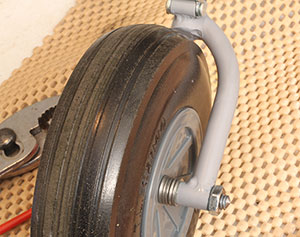
from rubbing against the gear leg.
The Robart Electric Retracts have two set screws at the arm that drives the struts. Loosen these slightly so you can align the wheels parallel to the airframe centerline then tighten them down. Some will file a small flat spot on the strut once this position is established to help prevent them from turning. I always use thread locker on these set screws just to be sure.
You can now add wheel doors that mount to the strut if you are going to use them. These also must be centered in their openings to prevent binding. Using thread locker on these mounting screws is also a good idea.
With the Robart Electric Retracts installed and aligned it is time to mount the wing to the plane, connect it to the receiver being used and check the operation. Nothing should change other than you might have to reverse the servo for whatever switch is used. I always use the Gear switch on my Spektrum DX9 and set it so that with the switch pulled towards me the wheels are retracted, push the switch away from me and the wheels extend.
All that remains is flying your plane and doing nice smooth landings. Keep in mind that retracts are something that needs to be checked occasionally. If you have a hard landing, check the retracts for bent struts or an alignment issue that can be caused by the mounting flange getting turned slightly. Check the fasteners for tightness occasionally as you would anything else on the plane and all should be fine.
As you should with any major change to an airplane, check your CG! On the Top Flite™ Giant P51D Mustang ARF the Robart Electric Retracts are mounted almost dead on the CG line so there was no change for me but I did check anyway.
It goes without saying that the Robart Electric Retracts performed great in the air or I’d have a bunch of Top Flite™ Giant P51D Mustang ARF pieces instead of a still-shiny model. On the ground a good set of retracts is at least as important as during takeoff and landing.
The spring action of the Robart Electric Retracts smoothed our spring-bumpy grass runway and made those takeoffs and landings easier to deal with. The Robart Electric Retracts have a shock absorbing quality that reduces the jolts of the bumps to the airframe. In addition to protecting the wing structure, that spring action makes handling far more predictable over the worthless fixed gear we tried originally on this Top Flite™ Giant P51D Mustang ARF. I love Top Flite planes but their fixed gear, like all fixed gear in war birds his big suck. The Robart Electric Retracts are the solution.
There is a reason that Robart has been the gold standard in retracts for so long. They make high quality components that fit the planes they are designed for correctly. My experiment of using the wire gear supplied with the Top Flite™ Giant P51D Mustang ARF kit inadvertently showed how much the Robart Electric Retracts really help the plane during take offs and landings as well as driving around on the field. The wheels are far more stable and the plane tracks much better with the Robart Electric Retracts installed.
Good quality parts are never cheap but the $459.95 (3-8-2017) price tag for the Robart Electric Retracts is more than reasonable when you consider the alternative. Aside from losing the scale visual of the wheels being retracted and extended the stability afforded by the Robart Electric Retracts is far easier on the airframe. Having the wheels go up and down so reliably is also a consideration. I fly my war birds quite a bit but they do sit around for a while now and then. Knowing I can depend on the wheels going up and more importantly coming down again when I want them to is priceless.
Visit the Robart Electric Retracts web page – Click Here
Have a comment on this Review? –Email Me!