|
|||||


FlyingRC.net is a
Veteran-Owned site.

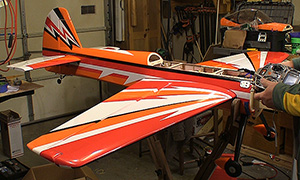 |
Getting my RedwingRC 50cc Yak 55 ready for the final CG check took some doing but getting this right always results in a better flying plane! Click image to enlarge |
RedwingRC 50cc Yak 55 Segment 3
Getting serious about balance and final setup
Text, photos and video by Tom Hintz
Posted – 4-1-2015
This segment is all about getting the CG finalized and hopefully doing that with the placement of the equipment. In the last segment I had the cowl mounted for the first time with the prop in place. I used 2-1/2” standoffs on the DA-50R and then added a ¼” spacer with a flat washer under each of those. The prop just barely cleared the cowl on the (pilot) right side because of the engine angle. That actually came in handy as moving the motor out another ¼” cures this interference and should help keep the CG location more forward.
The throttle servo was mounted in the engine box to most benefit the CG. Plus this means a short throttle linkage which is always a good thing. For the linkage I used a section of all thread 4-40 rod with ball swivels at both ends. If you want a precise idle we need to get rid of the slop of a z-bend throttle linkage.
Last for the engine installation was making a manual choke rod. I like the simple z-bend rod suspended by two plastic ties to the front of the cowl. Access to the rod is simple on the RedwingRC 50cc Yak 55 and it is a less complex system than adding a choke servo. Some closed cowl designs make a choke servo more desirable.
The Smart-Fly PowerExpander Sport Plus was mounted directly behind the wing tube just because there is not enough room to put it over the tank or in the forward portion of the fuse. The Smart-Fly PowerExpander Sport Plus weighs close to nothing so its effect on the CG will be minimal. Once that board was mounted I could finish running all of the servo cables but will tidy the wires themselves up after I get some flights in and am sure the CG I where I want it.
 |
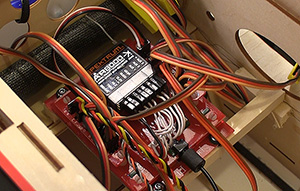 |
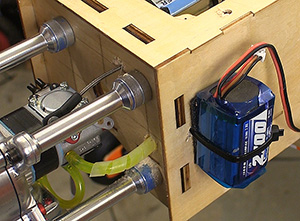
I crowded the front of the plane (left) to help keep the CG in a good place. I ran out of room and had to put the SmartFly board behind the spar (right) but that worked out in the end. You have to play around with placement of the equipment to get the CG as close to perfect as you can before adding any weight. Click images to enlarge |
|
At this point I installed the access panels for the failsafe pin and flag switch and the ignition. The failsafe access panel has charge jacks for the twin 7.4V, 5000mAh main batteries. The ignition panel has a charge jack for the single 7.4V, 2700 mAh ignition battery pack. Both panels have LED lights indicating they are operational. The ignition panel also has a nice fuel dot built in.
This layout of the necessary equipment serves the CG well but dictates more extension cables than I like. I applied shrink tubing to most of the extension cable connections and safety clips to the others that might have to come apart now and then. This is also a good time to make another pass through the wiring looking for points of chaffing or interference.
One of the last things I do on all new planes is to cut the cowl to clear the engine and muffler. On the RedwingRC 50cc Yak 55 that process took on a whole new level of difficulty because of the large, wrap-around Pitts style muffler I had. One of the good features of the RedwingRC 50cc Yak 55 now works against us a little also. The plywood ring set inside the rear edge of the round cowl makes attaching it to the plane very easy and secure but fitting that around the motor and muffler combination is more difficult because the rear edge of the cowl does not distort.
I use the cardboard template method of cutting cowls but that usually just gives you a starting point. After that there can be several trial fits followed by more cutting. Some try to keep the cutouts as small and close-fitting as they can but we have to remember that we need about twice the exit area as we have intake area on the front of the cowl to get enough air movement through the cowl in flight. That means bigger openings are just fine – and easier to make and get the cowl on and off without having to hide the women and children. However you do it, count on cutting the cowl to take longer than you expected and to make a far bigger mess than seems possible.
I put the wings on with and with everything plugged in, bound the Spektrum™AR8000 8-Channel DSMX Receiver to the Spektrum DX8 DSMX Transmitter. Because I had programmed the servos with the Hitec HFP-25 Digital Servo Programmer & Tester all I had to do with the radio was confirm sub trims and set up my normal throws and dual rates.
 |
|
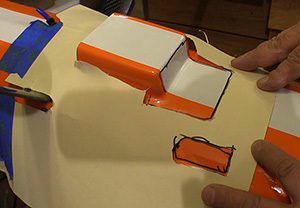
I use the cardboard technique for cutting cowls. (left) It works as good as anything is only a guide. You have to cut and fit a bunch after this point to get it right. Click image to enlarge |
|
It is important to stress that I have developed my “all you can get” throw package over lots of flying years, starting when I flew 25 years ago. If you are not already comfortable with large throws it is better to follow the setup information provided in the RedwingRC 50cc Yak 55 instructions. There will give you a very capable but controllable plane. Then as you get used to it you can increase throws if you like.
I move all of the dual rates to the rudder dual rate switch so I can change quickly if the wide open throws prove to be too much. With the dual rate switch in the 0 position all surfaces are 100% with 70% expo dialed in for all of my dual rate settings. Move the switch to the 1 position and I have 70% throw and 50% throw in the 2 position. I like flying with the wide open throws but do experiment with the lower settings as some planes like less input for some maneuvers.
All that remains is to charge the RedwingRC 50cc Yak 55 up, look over the servos and linkages once more to get ready for the maiden flight. I save range checking the radio until I am at the field.
RedwingRC 50cc Yak 55 Segment 1 - Click Here
RedwingRC 50cc Yak 55 Segment 2 - Click Here
RedwingRC 50cc Yak 55 Maiden 1 - Click Here
Visit the RedwingRC 50cc Yak 55 product page - Click Here
Have a comment on this review segment? –Email Me!
All Flyingrc.net written, photographic and drawn materials are property of and copyright by Tom Hintz and Flyingrc.net 2013-2020 Materials cannot be used in any way without the prior written permission of the owner.
Privacy Statement