


We got into the robotic cameraman idea early, probably too early.
Text, photos by Tom Hintz
Video footage by Gihad Jawhar, Tom Hintz and SoloShot2
Posted – 6-23-2015
UPDATE - 8-13-2015 - The SoloShot2 vertical tracking speed is currently maxed out by the speed of the tilt servo motors. They may go to faster tilt servo motors in future versions but nothing is set in stone at present.
See the updated test - Click Here
Shooting video of RC planes is always difficult. When you go through the amount of video I do, (you see maybe a 1/20th of what was shot before editing, getting enough good footage is tougher yet. Keeping the plane in the frame without the telltale shaking, sneezing and other aberrations is challenging even for experienced camera operators. Upon discovering the SoloShot2 Robotic Cameraman I was hopeful that my video making world just got easier.
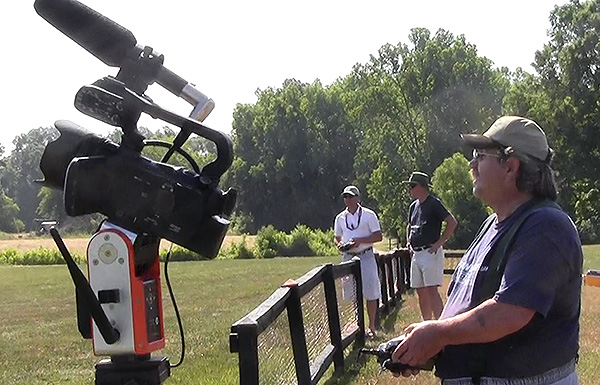
The SoloShot2 Robotic Cameraman really is just that. It consists of a base unit that holds the camera and creates the necessary pan and tilt movements to follow an object or person. While you can put a fixed camera like the popular GoPro on and let it go at that, use a compatible camcorder (they have an extensive list on their site) plus their Camera Control Module and the SoloShot2 Robotic Cameraman adds automated zooming to its capabilities.
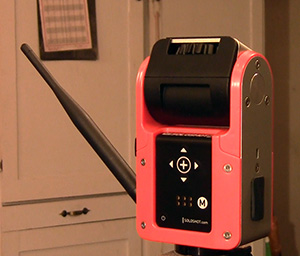
The SoloShot2 Robotic Cameraman uses a “tag,” a small electronic device that goes on the object or person being videoed to tell the base unit where it is. The tag is 50x47x23mm and weighs 2.1 oz., not a lot but enough to upset your CG (center of gravity) depending on location and overall plane size. This is probably a world class over simplification but I am not about to guess at what all is going on inside the tag or base units. I know it involves satellites and radio transmissions and that tells me to focus on things like “does it work”.
The base and tag of the SoloShot2 Robotic Cameraman are equipped with rechargeable batteries. Their literature says the base is good for up to 8 hours and the tag around 4 hours. You can extend the tag battery life by shutting off the radio portion during “down times” when tracking is not needed. However you can’t shut it off without having to go through an eight minute warm-up and then a rather involved “setup” to get everything working together.
If you use one of the compatible video cameras (my Canon XA10 was on the list and was a deciding factor in my buying the SoloShot2 Robotic Cameraman) you can get the accessory Camera Control module that “talks” to the camera and maintains the chosen window size by zooming in and out as the distance to the TAG changes.
The base unit houses the electronics
and mechanical drive that moves the
camera.
The literature says that the SoloShot2 Robotic Cameraman base can rotate 360 degrees at approximately 80 degrees per second. For every additional 10ft the subject is from the SoloShot2 base, you can add 10 mph to the tracking speed capability. They also say that the base can tilt the camera 90 degrees up and 60 degrees down and can track the object through that range at 35 degrees per second.
The SoloShot2 Robotic Cameraman has several options when it comes to what kind of action you are recording. You can choose from three different “field sizes” and pan/tilt combinations from no tilting to some tilting and the big altitude that will be of most interest to us here.
Considering all that the SoloShot2 Robotic Cameraman seems to be doing to direct the camera at a given object I was not surprised to discover a rather lengthy setup process. However, to be sure I was getting all this right I spent extra time going step by step following the “cheat sheet” instructions that come with the base/tag unit and another cheat sheet for the camera control module if you use that. The cheat sheet for the camera control module is different and must be used only with the control module.
First you have to turn on the tag and set that in the open for 8 minutes to warm up. And, no, this warm up does not go faster when it’s hot out. I doubt much has to actually get warm but lots may have to lock in on satellites to get its bearings in the world.
While the tag is warming up you can set up the SoloShot2 Robotic Cameraman base on the tripod, mount your camera and get that set up. This is where you will select any options in the base, probably just the first time. This involves pressing a few buttons to change LED colors as explained in the manuals.
We also have to get the camera aimed at a center object to define the center of the area in which the action being recorded will occur. The exact steps here depend on if you are using the camera control module or not and the steps are laid out in the cheat sheet for that combination. Essentially we are aiming the camera and base at the centering object and setting the zoom, again in a specific way for control module or no module. At the end of this portion of the setup you actually plug the camera in if you are using the control module.
When the tag finishes warming up, indicated by a blinking red LED you have to take it for a walk, holding it top-side-up in your hand. The actual number of steps needed in the “walk about” part of the setup depends on other settings in the base so pay attention to the instructions. For the big altitude setup I am using the walk is longer, like 150 to 200 steps. The actual number seems to vary depending on which instructions or support person you get it from. I stick with 200 as more is supposed to be better, though at one point the instructions say more than 150 steps is of no real value but support said 200 steps.
At the end of the walk about you hold the tag over the base and press + buttons on both units to “pair” them. Then you take the tag out to your centering object and push the + button again and that calibrates the base to the tag. The base will now be tracking you and if the camera control module is used the camera will start recording so smile and walk fast. You can shut off recording from the tag if you want.
All that is left is to mount the tag on the object being recorded. I want to again mention being careful when putting the tag on a plane. They give you an elastic hook and loop band that works great on many tail sections but with the tag it weighs over two ounces so could easily make your plane tail heavy with all of the dangerous handling issues that condition can entail. THINK ABOUT CG when installing the tag!

The "tag" is what goes with the plane
and gives the base the signal to track.
The SoloShot2 Robotic Cameraman sounded like a great idea that had the potential to improve my work on FlyingRC.net so I gambled $560 and change to buy the original outfit. Since I added another $160 for a Sony HDR-CX405 camcorder like the one included in the full SoloShot2 Robotic Cameraman package in hopes of eliminating what might have been a firmware problem with my Canon XA10. I should note that the Sony is a great little camera on its own and it is not responsible in any way for deficiencies of the SoloShot2 Robotic Cameraman. I had big hopes that the SoloShot2 Robotic Cameraman would help my RC-related video work but in that use the reality turned out to be less than the hype.
I chose my Hangar 9 1/4-scale PA-18 Super Cub as the test subject for the SoloShot2 Robotic Cameraman review because it is big and relatively slow. My intention was to start with the Hangar 9 1/4-scale PA-18 Super Cub and then move on to a faster model like my Aeroworks 50cc Edge 540 but I never got that far.
It is important to say that for all of the testing I used the Big Altitude setting, normal tracking and the widest frame available in the SoloShot2 Robotic Cameraman base. All of these settings should favor recording RC flying just as using any of the tighter frame options would work against the SoloShot2 Robotic Cameraman. I spent several days and made over 5 hours of actual flight recordings trying to get the SoloShot2 Robotic Cameraman working. All of the setup steps were repeatedly done exactly as prescribed in the instructions and later as suggested through my contacts with SoloShot2 Robotic Cameraman support. See more on the support encounters below.
The SoloShot2 Robotic Cameraman does a pretty good job tracking the plane that is flying relatively level with the horizon. I was impressed with the speed of the horizontal panning but add nearly any kind of vertical and the SoloShot2 Robotic Cameraman gets lost. I purposely kept climbs out from take-off shallow but nearly every time the plane would disappear from the top of the frame and often not return for what seemed to be a long time. When the plane descends at even moderate rates it would often exit the bottom of the frame as well. I did find that when descents were very gradual as in landings the SoloShot2 Robotic Cameraman kept the plane in the frame very well.
Virtually all of the problems encountered with the SoloShot2 Robotic Cameraman involved vertical performance. While the plane would leave the frame occasionally during faster direction changes tracking on the horizontal plane was overall very good. Vertical tracking overall sucks. I tried reducing speed to the point that the Hangar 9 1/4-scale PA-18 Super Cub was becoming unstable yet it flew out of the frame when going up or down, more so up.
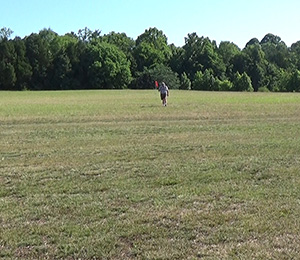
One of the truly aggravating parts of
this early system was the "walk-around"
that was necessary to "train" the system.
I tried “cheating” the setup to use less zoom to effectively expand the frame size to no avail. I also used the arrow buttons on the base to take the center point upwards trying to expand the top of the frame but again, no significant improvement.
As I do with all of my reviews, when a problem is encountered I go to the manufacturer to be sure it is not something I am doing that is compromising performance of the product. The interaction with SoloShot2 Robotic Cameraman support became even more frustrating than the deficiencies of the unit itself as it relates to RC flying.
At this writing, 6-20-2015 contacting SoloShot or using their web site to get answers to cure problems might be funny if it wasn’t so frustrating. The more I got into the quest for answers the stranger it got. As I worked through the learning curve for my SoloShot2 Robotic Cameraman I began noticing glaring errors on their site as well as in the “suggestions” I was getting from their support email.
In the on-line version of the instructions the text repeatedly says to turn the auto focus on when all of the printed versions I had call for it turned off (focus set to infinity) as we have found best in shooting video for FlyingRC.net. But you see many SoloShot videos on line from users who follow the auto focus ON advice and the camera can be frequently seen searching for focus.
In an email exchange when I asked which of the digital zoom choices I should use for my Canon XA10 because the “cheat sheet” included with the SoloShot2 camera module that controls zoom and says to turn digital zoom on, I got a very strange answer. First, it said “Per the directions, you actually need to turn Digital Zoom OFF completely”. (Their caps incidentally) Also, and this really pushed it over the edge, the email states “To ensure you're operating at the highest level, make sure you download the Firmware for the Canon HF G20, which is similar to your camera, to make it compatible with the Camera Controller.” Now they have firmware for the Canon XA10 in their list and on their site which made me wonder why I it would be better to use firmware for the Canon HF G20. I was quickly becoming suspect of their support and began saving all of the emails to compare answers to be sure I was reading this stuff right. I did download and try the firmware for the HF G20 with no change in tracking accuracy.
During a phone call to their support about getting firmware to update the person wanted me to send them a video of me working the buttons and LEDs that I was describing to them as I did it on the phone. I have actually heard of this video evidence requirement before from a tech line person who told me it is a great way to get people to leave you alone. It worked as I figured out my issue on my own and hung up.
Suffice it to say I am not impressed with the SoloShot2 Robotic Cameraman support system. A friend of mine who was observing all this said it sounds like the SoloShot2 Robotic Cameraman might have been rushed to market before it or the support system was perfected and I have seen nothing to refute that opinion.
I suspect that the SoloShot2 Robotic Cameraman might have lots of value in recording things like soccer players or bicycle off-road racers and similar subjects. It seems that if you eliminate the big altitude changes the SoloShot2 Robotic Cameraman is very happy and functions well. Unfortunately the RC aircraft world can’t eliminate altitude changes so this deficiency is a big problem.
Perhaps the SoloShot2 Robotic Cameraman just needs more development to be able to track vertical changes but I have to deal with what it does right now. The SoloShot2 Robotic Cameraman does a pretty good job if you keep the plane low and relatively level. It also does landings pretty well from short final onto the runway. But it you want to record your plane climbing out on takeoff, going up to do a spin or any other even mildly vertical-based maneuver the SoloShot2 Robotic Cameraman just gets frustrating. Trying to resolve this performance issue through the SoloShot2 Robotic Cameraman support can be just as frustrating.
With a price tag hovering around $500 once shipping is added the SoloShot2 Robotic Cameraman might be a good value for sports like soccer and other flat-oriented activities but for RC flying I just cannot recommend it. I believe I have given the SoloShot2 Robotic Cameraman far more effort than should be needed to get something to work. Since I own this outfit I probably will try to find ways to improve its performance but there isn’t a lot of confidence at this point. It would make more sense to find a “soccer mom” that wants to record their child’s events. That seems to be right up the SoloShot2 Robotic Cameraman alley. RC flying just seems to be outside the capabilities of the SoloShot2 Robotic Cameraman as it is right now.
See the SoloShot2 Robotic Cameraman web page – Click Here
Have a comment on this review? –Email Me!