|
|||||


FlyingRC.net is a
Veteran-Owned site.

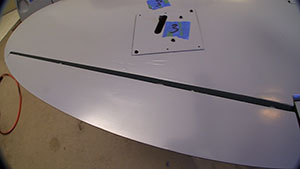 |
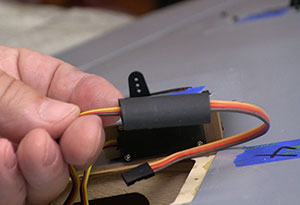
| Top-Flite has the hinging done for us so putting the wings together is a much shorter project than normal. Click image to enlarge |
Top-Flite Giant Scale P47 Razorback – Segment 2
I keep finding good stuff while assembling the wing
Text, photos and video by Tom Hintz
Posted – 1-25-2016
Because retracts and flaps have been added to my normal aileron only wings this segment will focus only on assembling the wing. Though the hinging on the wing has been done for us the addition of retracts and a laminated wing spar adds a little bit of complexity to this build. I say “a little” complexity because if you have built any of the cheaper ARF’s the Top-Flite Giant Scale P47 Razorback is a walk in the park by comparison. Top-Flite provides good instructions combined with user-friendly engineering that makes putting this plane together easier and faster than the lower-priced excuses for kits.
I did go over the aileron and flap hinges as the instructions say to be sure the hinges were glued solidly. I have pulled on all of the hinges in this plane and have yet to find one that even hints at being loose. All of the hinge gaps run from small to nearly non-existent.
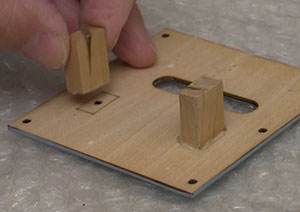
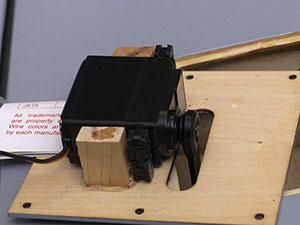
Installing the servo mounting blocks on the underside of the panels is a snap because Top-Flite® lays out the location of the blocks. I used the Epo-Grip paste epoxy to install the blocks then put a little chunk of iron on each pair to be sure they “settled in” to get the best bond I can. The next day I removed the weight and added a screw into each block that further secures them, as all installations like this should be.
To avoid confusion, I labeled each servo door with a number then added a piece of making tape to the wing just above the servo door with the same number. This is just a simple way to avoid small errors caused by small differences in the doors.
 |
 |
| The blocks for mounting servos (let) go in etched, no mistake layout lines and are doubly secured with a screw in each. Top Flite suggests putting a 1/16" spacer under the servos (right) to reduce vibration. You should be doing that on every plane with servo mounting like this. Click images to enlarge |
|
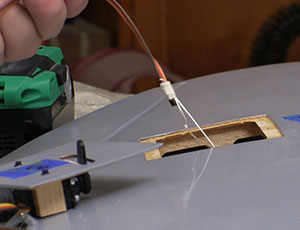
Top Flite® gives us plenty of string for pulling the servo cables to the root of the wing. I discovered that the “strings” are actually one piece of string that runs from the aileron servo out of the root rib then back up to the retract cable. The flap servo is close enough to the root to just drop its cable to where you can reach it, and then pull it up through the pre-cut hole on top of the wing.
After doing the basic setup on the servos I began making the control linkages. Top Flite® includes quality clevises both threaded and solder on along with metal rods that are threaded on one end. With the control surface clamped in its neutral position I marked the cutting point so the rod end protrudes through the clevis a little. Then I used silver solder to permanently attach that clevis. This is a very quick but efficient way to make tough linkages sized perfectly for the plane. Once again, Top Flite® puts the good stuff in the kit so another trip to the hobby shop is eliminated. Because it is silver solder you need a good soldering iron/gun.
Joining Wing Halves
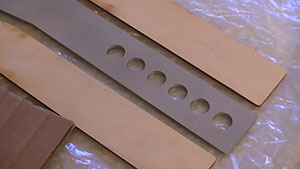
The Top-Flite Giant Scale P47 Razorback comes with a three-part wing spar. It has plywood outer surfaces and a tough aluminum center bar that has holes in it to keep the weight down. I used the long setup Epo-Grip paste epoxy to assemble the spar pieces. Then I used several clamps to hold the pieces in place, paying attention to the alignment before setting is aside to cure overnight. After curing the spar needs to be free from squeeze-out epoxy, particularly along its edges. I used the “fine” side of a woodworking rasp to clean up the edges of the spar, make them square and gently round the edges to reduce “snagging” as it is pushed into the cavities in the wing.
Because we need the spar to fit snugly getting it into its cavity is going to take a bunch of trial and error fitting. I used an electric sander with fine paper to slowly reduce the spar until it could be pushed fully into each half of the wing. I even fit one side to the right wing, labeled that and then fit the other side to the left wing. I don’t want to find out later that there is a difference internally when the epoxy is curing before I can get the spar in.
The peanut butter-like consistency of the Epo-Grip Paste with its 3 to 4 hour working time made coating out the root ribs, spar and spar cavity easier because I was not rushed. Also, I could apply a decent thickness film of the epoxy without it running which is a huge benefit for this kind of assembly.
 |
 |
| The strings for pulling wires through the structure (left) are plenty long to be easy to use. Top-Flite also includes shrink tubing (right) for securing extensions! You will find lots of quality parts and pieces in this kit that you would probably replace with a "bargain" kit. Click images to enlarge |
|
When I was assembling the wing it was around 16-degrees in the shop so I was doing all this in a smaller space in the house. I have to say that joining the Top-Flite Giant Scale P47 Razorback wing halves was more of a test of coordination than I anticipated. The covering job Top Flite® does actually makes the wing feel slick to the hand because it really is smooth. But after a little push-me pull-you the wing halves were joined and I used the included rubber bands to apply clamping pressure to the wing halves while the epoxy cured. Alcohol and paper towels were used to clean up any excess epoxy that squeezed out of the seam between the wing halves.
After joining the wing halves I installed the control horns on the ailerons and flaps. The holes are not drilled for the control horns but there are plywood plates under the covering in line with the servo control arms. I put the screw-on clevis on the control rod, attached that to the servo arm and then used the rod laid over the control surface to mark where the control horns are installed. The plate under the covering has plenty of surface but you do have to be careful not to drill all the way through the flap or aileron.
The receiver and batteries were used to put the servos at their neutral point so the control linkages could be made using the hardware included in the Top-Flite Giant Scale P47 Razorback kit. I’m not a big fan of solder-type clevises but when those pieces are of the quality Top Flite® includes that process went faster than I anticipated. Doing it this way also produces the perfect length linkages which makes dialing the control surfaces in very easy.
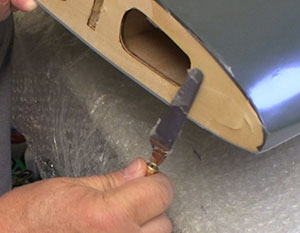
The Top-Flite Giant Scale P47 Razorback comes with aluminum tubing that represents the eight machine-guns located in the wings. The manual provides exposure lengths for each so I marked them, mixed up some of the Epo-Grip long set paste epoxy and installed those pieces of tubing.
 |
 |
| The heavy aluminum center piece to the laminated spar (left) means you sill not be bending or breaking this unless you try flying through a building or something. I used the Epo-Grip epoxy for joining the wing halves (right) also. Click images to enlarge |
|
A strengthening plywood doubler gets epoxied to the underside of the wing at the 1/4-20 bolt holes. After carefully tracing the doubler and cutting the covering away we have to epoxy that piece in place. The only way to really align this correctly is to use the bolts. I sprayed the bolts with WD-40 and then coated the bottom of the doubler with 6-minute epoxy. I used the oiled wing bolts to locate the plate and clamped it in place so it conforms to the dihedral in the wing. After the epoxy cured I removed the clamps and then unscrewed the bolts from the epoxy. A day or so later when the epoxy was fully cured I cleaned the bolts holes out with a drill.
The final steps to finish the building of the wing is to install the retract control box onto the center of the wing where it will be inside of the fuselage. The control box is super light so double-sided foam tape will work fine. Since both the ailerons and flaps are on Y-cords I can group the wires coming out of the wing and using the cavity within the wing at that point to hide the excess cable that is not needed to make the connections to the receiver in the fuselage.
There is a center section that gets epoxied to the bottom of the wing that continues the bottom contour of the fuselage. I have prepped that piece and will epoxy it in place at the end of one of the coming days. Trying to locate this center section with the wing off of the plane is just not the way to do it.
Aside from the final setup of the control surfaces the wing is done. Once I get the fuse nearly completed I can go in and set up all of the control surfaces, according to the specs in the instruction manual so some of my friends at the field don’t hyperventilate over my “excessive” throws. Actually they are probably excessive for a warbird but I have to keep poking at everybody or they will think something is wrong with me.
See the previous Top-Flite Giant Scale P47 Razorback build and maiden stories
Segment #1 – Segment #2 – Segment #3 – Segment #4 – Maiden #1 - Maiden Final
Video Tour |
Have a comment on this review? –Email Me!
All Flyingrc.net written, photographic and drawn materials are property of and copyright by Tom Hintz and Flyingrc.net 2013-2020 Materials cannot be used in any way without the prior written permission of the owner.
Privacy Statement