|
|||||


FlyingRC.net is a
Veteran-Owned site.

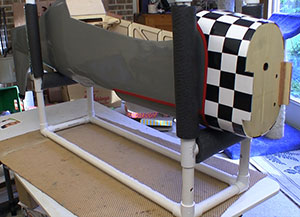 |
| The Top Flite™ Giant P51D Mustang ARF fuselage in the cradle I made to protect it during assembly and at the field when installing the wing. Click image to enlarge |
Top Flite™ Giant P51D Mustang ARF -Segment 1
I build and fly one for my Father
Text, photos and video by Tom Hintz
Posted – 10-10-2016
Getting a new plane is always a fun time. Getting the Top Flite™ Giant P51D Mustang ARF has some extra meaning to me. When I was a kid my father used to take me to a local air show every year so we could see the airplanes close up. I noticed that my Father was particularly interested in the P51 that was in the show every year. My Father drove a tank in “Patton’s Army” in Europe during WWII and told me about having the P51’s zoom low overhead as they lined up for gun or bombing runs on German emplacements ahead of the tank column. My Father is gone but his memory will be with me whenever I fly this Top Flite™ Giant P51D Mustang ARF. I appreciate everyone that made this build possible.
Un Boxing
This un boxing section of reviews is getting pretty commonplace because just about everyone used heavy double boxing to ship ARF’s around the world. I’ve not had any shipping damage and while I know that it still can happen, it is not happening very often. One of my steps in unpacking a new plane is cutting the boxes up so that they fit in the recycling container better and take up less room.
The Basics
The Top Flite™ Giant P51D Mustang ARF (#TOPA0700) is a 1/5th scale model of one of the most famous WWII fighters. It has an 84.5 in (2140 mm) wing span and 1245 in² (80.3 dm²) of wing area. Combine that with the projected 17.5-19 lb. (7.9-8.6 kg) all-up weight produces a wing loading of 32-35 oz/ft² (98-107 g/dm²). The overall length is 73.5 in (1865 mm).
 |
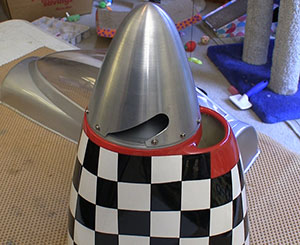 |
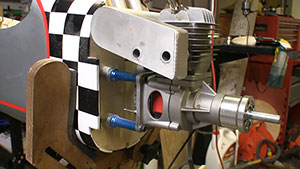
| Mounting the EME60 was easy (left) but it is obvious the muffler is going to hang out some. A nice surprise was this 5" aluminum spinner (right) that was included in the kit. Click images to enlarge |
|
Top Flight puts the motor needed at 2.1-2.8 cu in 2-stroke glow or 2.5-4.3 cu in gasoline engine. The radio system needed is based on a 5-7 Channel radio with 9-11 servos. Certainly we could get away with a lesser radio system and smaller engine. However, with a large warbird that retains at least some of the original flight characteristics of the full scale plane this model is designed around I believe that lots of engine power as well as a bit of overkill in the radio system are both helpful to achieving a good flying, dependable model.
Radio System
I will be using my trusty Spektrum DX9 transmitter along with my giant scale usual Spektrum AR9110 Power Safe 9 channel receiver that comes with a “soft switch” that is designed so that it can only fail to the On position. Another level of security for a very big plane. I have a lot of faith in HiTec servos so chose their HS-5495BH high voltage servos capable of generating 105 in oz of torque on the 7.4V supplied by the pair of Glacier 7.4V, 5000mAh battery packs. Using servos with a bit of excess power means they are not running at maximum output which I believe gives them a longer, more dependable lifespan. Because planes can come and go, these servos will fit a much wider range of planes in the future if something awful should happen to the Top Flite™ Giant P51D Mustang ARF.
Starting Out of Sequence
Sometimes I anticipate problems with the fit and finish of components that make me jump the assembly sequence some in case additional parts have to be made or ordered. One was the installation of the EME 60 engine. The mounting bolt pattern of the EME 60 is identical to that of the DA50 so that part of the installation was easy after I figured out the standoff needed to hit the 7-3/4” maximum firewall to prop washer dimension. I found that with this dimension the wrap around Pitts style muffler cleared the motor box. The down tubes themselves still interfered with the bottom lip of the fuselage a bit so I had to carve a couple half-round cutouts for clearance. To fuel proof those new cuts I applied several liberal coats of Balsarite.
 |
 |
| I favor Spektrum PowerSafe receivers and HiTec servos (left) in my giant scale planes. The aileron and flap servos are mounted to the inside of the bay doors. (right) See the video for how I add security to this mounting system. Click images to enlarge |
|
The bigger issue with the EME 60 installation is the muffler clashing hard with the cowl. Warbirds that used the in line engines like the Rolls Royce Merlin that powered many P51D’s have an unusually narrow fuselage. That substantially reduces the muffler options. I decided to go with the regular Bisson wrap around Pitts style muffler because it has been bullet proof and does nothing to hinder the performance of the EME 60. That of course means more of the muffler hanging out of the cowl. If scale appearance was my priority I would have looked into a custom muffler but I want my Top Flite™ Giant P51D Mustang ARF to fly with authority so I sacrifice a bit of scale appearance for performance.
I decided to mount the horizontal stabilizer out of sequence to give it ample time for the long set epoxy to set. I also wanted a clear view so that I could install the stab in perfect alignment with the wing both horizontally and square with the fuselage. Both of those alignments are crucial to a good flying airplane. Setting the horizontal stabilizer now also frees me up later when the remainder of the tail feathers are installed and the linkages made.
The Wing
The next big assembly point is the wing. The servos are located in bays, suspended from the covers on hardwood blocks. I like to take my time to get these mounts properly aligned and improve their security. After using long set epoxy to attach the servo mounting blocks I add two screws through the bay cover and into each of the mounting blocks. I have had this kind of servo mount fail in the past which is why I beef it up like this. I would much rather have extra screw heads on the outside of the bay cover than a servo bouncing around inside of the bay.
The ailerons and flaps use pin type hinges so I took this time to epoxy those in place. The instructions call for cutting one segment off of the outside aileron hinge. That reduced leg is inserted into the outside aileron pocket to insure a consistent fit within the cove that accepts the ailerons and flaps. Long set epoxy was used on all of the hinges and the movement range of each surface confirmed before taping them all in place to allow the epoxy to cure.
 |
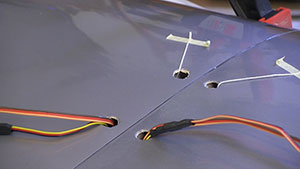 |
| When installing the horizontal stabilizer (left) I aligned it with a wing tube I laid in the wing saddle. The aileron and flap servo cables as we4ll as the retract cables or air lines come through holes in the top of the wing root (right). Top Flite even provides plenty of string length for the job! Click images to enlarge |
|
After pulling the servo cables through the wing and out of the provided openings in the top of the wing halves at the root I made sure that the strings for the retract air lines or cables for electric versions was also brought up through the top of the wing and secured. The final decision on the type of landing gear had not been made at this point so I wanted to keep all options open when joining the wing halves.
The Top Flite™ Giant P51D Mustang ARF uses a hardwood spar that has tapers cut in it. You have to test install this spar to get the right orientation or the wing halves will not meet properly. After test fitting the wings on the spar I mixed up a bunch of long set epoxy and coated out every surface of the spar itself, the pockets for the spar built into each wing half and the surface of the root ribs themselves before slipping everything together, clamping the assembly and then making sure that the alignment of the wing halves was correct. Then I carefully set the assembly aside overnight to let the epoxy fully cure.
Next up I will get the radio system bound to the transmitter and begin making the linkages for the flaps and ailerons. The tail feathers have to get glued on and those linkages made to connect the servos inside the fuselage. Stay tuned!
Have a comment on this Review? –Email Me!
Video Tour |
|
All Flyingrc.net written, photographic and drawn materials are property of and copyright by Tom Hintz and Flyingrc.net 2013-2020 Materials cannot be used in any way without the prior written permission of the owner.
Privacy Statement