|
|||||


FlyingRC.net is a
Veteran-Owned site.

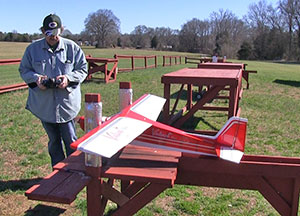 |
| Being grounded by weather so long made me stupid and I decided to maiden my Hangar 9 10cc Valiant in way too much wind> Click image to enlarge |
10cc Hangar 9 Valiant Build – Finish, Maiden, Disaster
Power, radio, setup, and one very bad decision
Text, photos and video by Tom Hintz
Flight Video by Mike Basmajian
Posted – 2-21-2018
This Review has dragged on far longer than most that I do, and I apologize for that. A combination of lousy weather, the Christmas holiday season and me “growing old and decrepit” all worked to impede progress on a review I had been looking forward to. Despite the things I did wrong here I still believe that the Valiant is the finest airframe design there is. This one maybe twice…
Engine
Naturally, Hangar 9 “recommends” installing the house brand $199.99 (12-16-2017) 10cc Evolution engine. I decided to go rogue and used the NGH GT09 Pro 9cc Gas Engine which has a price tag of $159.99 (12-16-2017) and a solid reputation for making good power.
The Valiant airframe produces lots of lift making me confident that giving up 1cc of engine displacement will have zero impact on flight performance. I also like the can-style muffler that comes with the NGH GT09 Pro 9cc Gas Engine. The Evolution has a very “glow-looking” torpedo-style muffler that hangs out the side of the otherwise nice-looking cowl. Cutting the cowl for the “hanging out” part looks way more complicated than cutting a hole for the down tube on the NGH GT09 Pro 9cc can muffler. These smaller gas engines (Evolution included) frequently use the beam style mounts included with the Hangar 9 10cc Valiant kit. I would love to see a more “gasser-like” mount that automatically indexes the engine square to the firewall that already has the proper thrust angles built into it. RC flying has a generation or two of fliers whose experience is frequently limited to ARF’s. Never having “built” (kit) a plane puts the ARF generation at a disadvantage. This is especially true with beam type mounts that are totally dependent on the builder locating and drilling the engine mount holes precisely.
Strangely for a Hangar 9 instruction manual the Hangar 9 10cc Valiant version says nearly nothing about the engine thrust angles. The following passage is all I can find in the manual on engine thrust angles, as it is printed. “The engine mounts will angle to the right and slightly down when viewed from the top and side of the fuselage. This is to compensate for the thrust of the engine.” See Resources below for a story on installing the beam-type mounts that uses the Hangar 9 10cc Valiant as the example.
I thought I might have to squeeze the NGH GT09 Pro 9cc Gas Engine into the Hangar 9 10cc Valiant cowl but that turned out to be simple. The cowl widens as it goes forward and that fits the NGH GT09 Pro 9cc Gas Engine and its can-style muffler perfectly.
 |
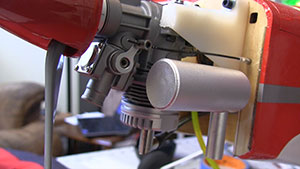 |
| I chose to use the NGH GT09 Pro 9cc Gas Engine (left) because of reputed power and a reasonable price. Both turned out to be true. I also liked the idea of the can-style muffler (right) that makes installation and cowl cutting way easier. Click images to enlarge |
|
For the initial flights I will be using the suggested 12X6 APC C-2 prop. Eventually I will try Vess wooden props on the Hangar 9 10cc Valiant. When I fly a Valiant I am looking for solid, engine/prop response to throttle. If you fly very slow, which is a ton of fun with a Valiant, getting hit by a tail wind can compromise lift requiring a quick squirt of power to keep it flying. With a new engine, I will be staying a bit higher than normal just in case the Hangar 9 10cc Valiant goes dead stick. I fully trust the Valiant airframe, but I am not stupid. “Discretion is the better part of valor” applies to any new engine so I use a bit of caution while the engine gets a little more time on it.
Radio Gear
I will use my Spektrum DX9 transmitter because I already have it and believe it is one of the best values in modern RC radios. The Spektrum DX9 has options I might want to try with the Hangar 9 10cc Valiant later like mixing, dual rate and expo later when I have the plane sorted out.
If you follow my exploits you know I usually install HiTec servos and I still like them a bunch. However, in response to a bunch of emails I will use the recommended Spektrum A6110, high-voltage servos. The Hangar 9 10cc Valiant uses seven servos, one on each aileron and each flap, one for the elevator, one for the rudder and the last for the throttle.
The Spektrum A6110 servos operate on 6.0 to 8.4V voltage. At 6V the Spektrum A6110 generates 57 oz-in of torque and at 8.4V that goes to 76 oz-in, both should be more than needed by the relatively small control surfaces.
Reasonable Receiving
It is common for Horizon Hobby to recommend their Spektrum receivers with the AS3X stabilization system. Sticking with the “going rogue” theme I installed a Spektrum AR8010T, 8-channel receiver. This is a reasonably priced receiver that features telemetry that can be used if you like. I primarily wanted the 8 channels because of the versatility it affords now and in the future. Plus, this is a relatively small receiver which makes stuffing it in something this side of giant scale way easier.
The Build
Despite being a bunch smaller than my giant scale planes, installing the servos correctly remains important. Rather than repeat the story here, click the link in the Resources section below to see our How-To on Installing Servos. I mount my servos exactly as shown in that article, always.
 |
 |
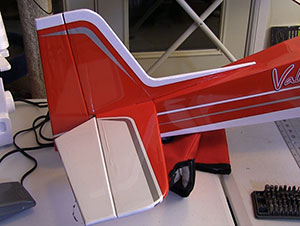
| One of the final tasks was setting control surface throw (left) which is very effective at the throws in the instruction manual. I love the Valiant flaps and how the airframe handles them. (right) I also found out that there is a limit to a small plane, flaps and big wind. Click images to enlarge |
|
Adding servos to the wings was easy because Hangar 9 designed great servo mounts and built them into the servo-doors in the wings at the factory. The security of these mounts will go a long way towards preventing these servos from shaking loose as happens too frequently when modelers must build already marginal mounts onto the wing servo doors themselves.
The preinstalled aileron and flap servo mounts also makes setting up the pre-assembled linkages easy and fast because they locate the servos correctly. I did change the included screws for retaining the servos and servo doors with the socket head screws I always use. See “Better Servo Screws” in the Resources section below.
Using individual servos introduces a couple more servo wires into the cabin area adding to the clutter. To eliminate plugging the wrong servo into the wrong channel I broke out my Brother PT-D600 Label Machine and made cable labels. A simple solution to protect the plane more later.
The Hangar 9 10cc Valiant comes with aluminum landing gear, wheel pants and wheels. I fly off grass so am swapping out the included wheels for 3-1/2” versions. I also did not use wheel pants on grass (my choice) so the larger wheels were a simple swap out. This doesn’t mean that you can’t use the included tires and wheel pants. I usually fly in the mornings which often means dew on the grass. That moisture, along with our field being mowed on Fridays adds up to grass clippings building up inside of wheel pants. Factor in my obsession with touch-and-goes and leaving the wheel pants at home makes sense to me.
In keeping with the “use what they sent” theme I am using the stock fuel tank included in the kit. I routinely tossed included tanks but the one included with the Hangar 9 10cc Valiant has a much larger shoulder around the outlet and a plug with a skirt that overlaps that neck. The included tank also has a three-line configuration, one outlet to the carb, vent and a separate fill line. I like this three-line system and use it on all my gas planes.
The folks at Valley View RC suggested a touch of oil on the inlet nipple on the NGH GT09 Pro 9cc Gas Engine along with warming the tubing itself to make it supple. I did both and the fuel line went onto the carb without much fuss. Getting the NGH GT09 Pro 9cc Gas Engine carb set up went well.
With the radio, engine and fuel systems mounted as per the instructions I found the CG (center of gravity) to be at 2-3/4” back from the leading edge of the wing. This is “middle-of-the-road” in the suggested CG range so I am leaving it there at least for the initial flights. Later I’ll decide whether to change the CG or not.
Control Surface Setup
I generally set the control surfaces dual rates to “all I can get” because I am used to that kind of response. However, the Valiant airframe is so consistent I would advise at least starting with the throws listed in the manual. Once you gain some experience with the Hangar 9 10cc Valiant and get it trimmed out you can play with increased throws to see if you like them better.
Maiden Flight
Note: Despite everything that happened on Maiden #1 day I remain positive none of it was the fault of the Hangar 9 10cc Valiant other than the flaps working so well. The real culprit was me deciding to do a maiden flight in too much wind and then playing with the flaps, again in too much wind.
I realize that posting this story opens the flood gates for the ever-present Internet Forum “experts” that will intimate that I am an idiot. However, since most of the folks from that end of the gene pool won’t know what “intimate” means in this context I might slide by, a little bit. OK, or so I hope.
Bad Decision #1
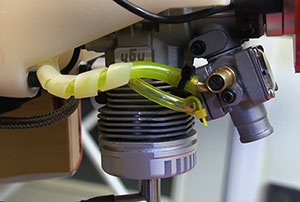
 |
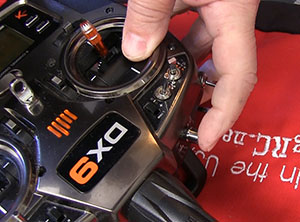 |
| The green LED (left) tells me the ignition is armed when this light is on. I always put the control for the ignition kill on the Trainer button (right) so I have to hold it to kill the engine and not accidentally flip a switch. Click images to enlarge |
|
Following a frustrating string of five rainy, cold weekends that kept the Hangar 9 10cc Valiant grounded I decided to do the maiden on a rain-free but cold, windy day with gusting in the 20mph range. I remember thinking that I would not have done a maiden flight on someone else’s plane in those conditions which made my decision to fly mine a bit more suspect.
The Hangar 9 10cc Valiant and its NGH GT09 Pro 9cc Gas Engine took off easily with plenty of power to maintain speed upwind and downwind in the gusty winds. The Hangar 9 10cc Valiant needed several clicks of up trim but got it dialed in as good as could be expected in the winds. The wing was unsteady with the trim changing between upwind and downwind legs of the oval I was flying. Again, not unexpected in the wind conditions. I did flip the dual rate switch to my “all-I-can-get” high rates to be sure I had plenty of aileron control, but then along came mistake #2.
Bad Decision #2
I love how the Valiant airframe responds to the flaps, so despite the wind I put them at full down. I used the rudder to help point the Hangar 9 10cc Valiant back into the wind and it went into a surprisingly-stable low-speed hover. There was enough wind going over the wing and control surfaces to produce enough lift for the ailerons to respond reasonably well at the current throttle setting. Of course, that also put the Hangar 9 10cc Valiant closer to a stall and I was not up all that high so decided to get on the gas and go around to come back a little higher to explore the flaps a bit more.
Bad Decision #3
When I used a bit of aileron to turn the Hangar 9 10cc Valiant downwind the right wing popped up, probably due in part to a gust of wind that came up right then. With the wind exceeding airspeed the right wing was not coming down, so I gassed it to build some air speed to help counter the wind while I continued to hold full right aileron, now helped along by a bunch of right rudder.
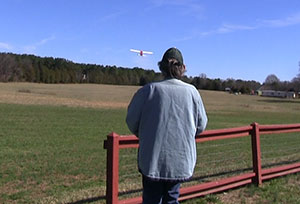 |
| Despite the winds, the Hangar 9 10cc Valiant flew well, until I told it to do the impossible. See the video. Click image to enlarge |
When you go to full flaps and full power on a Valiant in a right-side-up attitude it wants to go nearly straight up and will continue that “climb” until it goes over the top like it’s doing a big loop if you don’t control it with sufficient down elevator. I know that but failed to realize that with the Hangar 9 10cc Valiant on its side, the flaps were now acting like a bunch of elevator. I did try to flick the flap switch back to retracted but I either missed or the 2-second flap speed just took too long to retract.
As you see in the video, I had a second or two to decide what I did next. When I realized that a crash was imminent I continued to hold full right aileron and rudder while dropping the throttle to idle. Splat. The Hangar 9 10cc Valiant did try to rotate the right wing down but it was only a couple feet from the ground, so I left the power off and watched.
The Damage
Initially, I thought the Hangar 9 10cc Valiant was junk. When cameraman, Mike Basmajian, and I brought the wreckage back to my car Mike pointed out that the wing appeared OK. It did have a few busted pin hinges on one flap, but I have more. The wing tube now has a nifty S-bend in it, but I found replacement tubing. The cowl is cracked but since Horizon was out of them now I can make this one do for now.
The upper cabin area of the fuse is junk. I know there are people who can fix something like this, but I killed it, so it is just right that I spend the $90 or so and get a new one. The aluminum landing gear, axles, and wheels are fine and still firmly attached to the mounting block that was jerked out of the fuselage.
I can cut the tail feathers out of the fuse and save them. The pushrods are all fine. All of the radio gear is working perfectly, range checks much farther out than spec and none of the plastic gears in the servos have spit out any teeth. (I got a bit of “you’re dumb” email about using plastic-geared servos. Imagine me sticking my tongue out, which I really did but it was 2am and nobody was around.)
Watch for my next How-To where we look at rebuilding a wreck. The kinder of my audience will kindly assume that I crashed the Hangar 9 10cc Valiant just to be able to show you how to fix it. In a way I wish that were true, but the reality is that I messed up doing a maiden in that much wind.
Video Tour |
Resources
NGH GT09 Pro 9cc Gas Engine page – Click Here
Better Servo Screws
Installing Beam-Type Gas Engine Mounts
Installing Servos
Brother PT-D600 Label Machine Review
Have a comment on this Review? –Email Me!
All Flyingrc.net written, photographic and drawn materials are property of and copyright by Tom Hintz and Flyingrc.net 2013-2020 Materials cannot be used in any way without the prior written permission of the owner.
Privacy Statement