|
|||||


FlyingRC.net is a
Veteran-Owned site.

 |
| The 10cc Valiant has all of the proportions and construction that made the giant scale such a great flyer. I am anxious to get the 10cc Valiant in the air! Click image to enlarge |
The best-flying airframe in decades gets an in-between size
Segment 1, Unboxing, inspection, covering and hinging
Text, photos and video by Tom Hintz
Flight video by -
Posted – 11-22-2017
Unless you have been hiding under a very, very remote rock it will be no surprise that the Hangar 9 Valiant has been a favorite of a huge number of RC pilots of all skill levels - including me. From the initial giant scale followed by the little electric E-flite Valiant 1.3m Park Flyer to this 10cc Valiant the design has remained the same except for overall size to accommodate more flyer's and the size vehicles in which they carry planes to the flying field. If it’s a Valiant, I gotta have one! So, this Review was inevitable, plus I get to Review the NGH Pro 9cc engine in a properly-sized airframe. This is going to be fun.
The Basics
First, the 10cc Valiant is not a foamy as a few Internet Forum “experts” have claimed. Rather, it is pure Hangar 9, laser-cut balsa and lite plywood construction that has proven to be tough, light and consistently flyable. The 69" wingspan produces 640sq inches of wing area and wing loading of just 25oz/sq ft which produces the remarkably wide flight envelope the Valiant enjoys.
Like its giant scale brother, the 10cc Valiant has a two-piece, cantilevered, plug-in wing bolstered by an aluminum wing tube. The top hatch also makes the jump from the original Hangar 9 Valiant which makes field assembly simple.
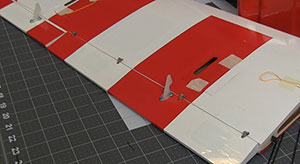
The flaps are properly sized, effective and predictable, characteristics seldom found in the same airframe. The flaps give the 10cc Valiant a remarkable STOL (Short Take-Off and Landing) capability that allows doing near vertical take-offs or flying from the smallest of RC flying sites without stuffing a bigger engine in the cowl. The flaps also slow the 10cc Valiant to a walk for landing on the wide-spaced aluminum landing gear that also enhance ground handling.
 |
 |
| The windshield area (left) is actually a big hatch held in place by strong magnets. This is great whether you use batteries or a gas tank. The servo mounts in the wing (right) are very well designed and made. Kudos to Hangar 9 for eliminating my having to re-build the weak mounts too many kits use here. Click images to enlarge |
|
A large front hatch/windshield is retained by pins and strong magnets to provide easy access to the battery or gas tank. You also get a nicely painted fiberglass cowl and wheel pants. I left the wheel pants off as I fly on grass and they just do not work well, particularly in this smaller size. I also up-sized the wheels from 2” to 3” diameter to further enhance handling (and my incessant touch and goes) on the grass. I use the Dave Brown treaded super light wheels and have had great success with them. Hangar 9 also has a set of floats that fit the 10cc Valiant to make use of this terrific airframe on the water. I have flown my giant Hangar 9 Valiant on floats and it is a blast.
Naturally, the 10cc Valiant is designed around the Horizon Hobby house brand engine so I got a NGH Pro 9cc engine as part of my decidedly low-level monopoly-breaking strategy. Installing the NGH Pro 9cc engine should not be an issue and lacking 1cc will not make a difference when flying the 10cc Valiant. Power simply is not an issue with this airframe.
Hardware
The 10cc Valiant comes with a nice set of easy-to-use hardware and linkages. If anything, the linkages are slightly over-sized for the control surfaces. One end of the linkages uses a Z-bend on the servo end and adjustable, heavy-duty clevises at the control surfaces. That should be just fine for everyone that likes to fly their planes a lot. If this is your first Valiant and you have a normal desire to fly, you are going to fly the 10cc Valiant a lot.
The 10cc Valiant comes with an electric motor mount that makes setting it up for that power easy. We also get beam type gas engine mounts that I have not worked with for over 30 years so this will be a bit of a re-education.
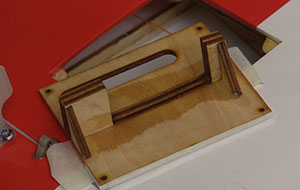
When I first came across the wooden engine mounting template I thought someone had forgotten to mount part of the firewall. The one that actually forgot something was me. I hadn’t read the very capable multi-language instruction manual or I would have recognized the template. It has three mounting patterns marked with specific engines but as so often happens each of those patterns will more than likely match up with several engine brands.
 |
|
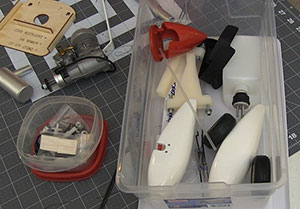
| I learned long ago to put all of the parts in a big tub (left) with a cover. I also put the smaller hardware and such in a lidded container. We do have to glue the hinges in place (right) but that goes quickly as most are CA hinges and all are fit nicely at the factory. Click images to enlarge |
|
Something else I liked was finding what appears to be a huge cutout in the bottom of the fuselage, extending back from the firewall. This appears to have been designed as a place to mount the ESC (electronic speed control) and to provide the airflow needed to keep its temperature down. For the gas guys it also provides a large air dump to insure good flow through the cowl. Way too many of us (me included) work hard at minimizing the size of cowl openings behind the air inlets up front. Many of us know that exit size must be roughly three times the area of the air inlets or the cowl can pressurize to the point that airflow is dramatically reduced, and the engine temperatures can get dangerously high. This is another plus coming from Hangar 9’s experience and understanding the RC modelers psyche.
The Build – Segment 1
Build Tip: I learned (the hard way) to dump all the included hardware and small parts into a plastic tub that has a lid or a close-able plastic bag. Since I began doing this I have never come up short on hardware and the time devoted to finding the next piece of hardware was cut to near zero. Spend more time building and less time searching.
As I normally do I checked the covering to tighten up and seal any loose edges or sections. I found no loose edges and only a couple places that needed tightening up. Once again, Hangar 9 did a nice job of covering.
I also went over the bare wooden joints with thin CA just to be sure. Again, nothing appeared to be loose or lacking glue. I always hit joints with thin CA anyway, just to make them a bit stronger and me feel better.
 |
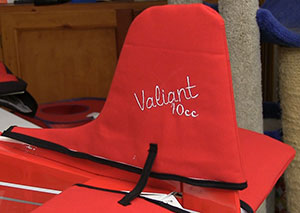 |
| The 10cc Valiant is a relatively small plane but I still made a padded wing bag (left) and padded tail feather covers (right) to protect the investment and structure. I have a new site coming on line yesmensew.com that will show what all I am making and how to do some of it! Click images to enlarge |
|
Despite its size, the 10cc Valiant features fully built-up tail surfaces which increases the lightness of the overall airframe. We do have to epoxy the horizontal stabilizer and vertical fin in place, but I like that as it gives me a chance to check and correct (if needed) the alignment of the tail feathers to the wing both horizontally and square to the wing tube. You can really screw up a planes’ handing by not paying attention to the tail feather alignment.
The flaps are mounted with pin hinges because of the radical movement through which they go. We must epoxy those pin hinges in place, but the remaining hinges are CA type. On a plane this size CA hinges are more than adequate. My giant Hangar 9 Valiant has mostly CA hinges and I have tons of flights on those none has come loose or cracked.
The tail wheel assembly is simple, secure and very functional. None of those stupid, frustrating little springs that constantly stretch on one side. This tail wheel is essentially a tiller style that locks directly into the rudder. Presto! Reliable steering!
They even provide two tail wheels. One is soft foam that makes less noise when flying off paved runways. The other is less spongy for used on other (grass) surfaces. I never listen to my tail wheels so will save both in case I wear out the one I put on first. I did “harden” the hole in the rudder into which the tail wheel arm is epoxied.
One of the things I am not a big fan of is how many kits mount aileron and flap servos. Specifically, having to glue blocks to the inside of thin panels in the wing. The 10cc Valiant comes with a ply framework and support for the servo mounts already glued in place. This system looks way tougher than others I have seen and for me, requires no modifications. Kudos’s to Hangar 9 for taking the time to come up with a well-designed, well-built servo mounting system.
Next Up
Video Tour |
|
Next, I must mount the engine and get the servos, radio gear, battery and switch. The 10cc Valiant includes pushrods for the tail surfaces and though I might be able to reduce the overall weight with carbon rods I am going to build and fly this model per the instructions, as most of you are likely to do.
Stay Tuned
Have a comment on this Review? –Email Me!
Visit the 10cc Valiant product page – Click Here
All Flyingrc.net written, photographic and drawn materials are property of and copyright by Tom Hintz and Flyingrc.net 2013-2020 Materials cannot be used in any way without the prior written permission of the owner.
Privacy Statement