Saving a Giant Scale Top Flite P47
A look at the repair process
Text and Photos by Bill Rutledge
Posted - 9-2016
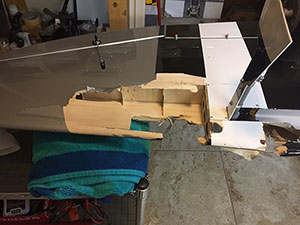
I got away with a 180-degree turn when my engine quit on takeoff at about 50-feet high. Unfortunately I couldn't clear the final tree and you see the resulting damage here.
All of the wing damage was confined to the area ahead of the spar. Had spar damage occurred I would have trimmed the ribs back about 3/32" on either side of the spar. I would then add a spar doubler on both sides of the spar ad would have glued a second rib to the existing rib that mated with the spar doubler strengthened with triangular stock.
Click the images below for a larger version. |

Assessing the damage.
|

I could see the damage was ahead of the
spar on both wings.
|

I know it looks bad and it is but it is very
fixable as you will see below.
|

This is a pattern maker from the local
hardware store. It makes duplicating
curved ribs and other parts far easier.
|

Cutting replacement ribs is fast and
requires surprisingly little fitting. |

Bottom of the left wing replacing the leading
edge with a doubler behind it. Much better
repair than cutting and fitting a butt joint. |

Removing the covering so I can trim the
balsa with straight edges for easier
replacement.
|

Replacement ribs installed, scrap balsa
used at rear of cutout to support the
sheeting. Also added a piece of triangular
stock to be shaped later for the leading edge.
|

Some of the replacement sheeting installed
flush with the retract mounting plate.
|

Remaining sheeting pieces fit and installed.
|

Top of the left wing, easier fix because the
leading edge repair was already complete.
|

Top of left wing, laying out straight cuts.
Small rib
segments were made to support
the leading edge ahead of the wheel wells.
|

Top of the right wing with sheeting installed
and putty applied.
|

Attempting to save the stars and bars
decal. Used medium heat to help peel
them back.
|

Most of the sheeting installed.
|

Bottom of the wing filled, sanded and
ready for covering.
|

Seam lines for the covering drawn out.
|

Bottom of the left wing finished.
|

Top of the right wing ready for covering.
|

Top of right wing done.
|

Top of the left wing with putty applied and
ready to sand.
|

Top left wing done. The only
evidence of
the repair is a slight difference in the
shade of the Aluminum Monokote.
|

The cowl had about a 1" hole in it. The hole
is directly over the dummy engine mount
so glassing it from the inside was not
possible. |

The repair taped and ready for paint.
|

After painting the cowl is ready to go back
on the P47!
|
Of course this repair was a lot of work but the actual cost was minimal and far below ordering new parts, if they were even in stock. Even better is that the top FliteP47 flies great again!
Have a comment on this story? Email Me!
Back to the How-To directory |


