


There's lots of ways to kill servo cables and that forced me to learn to replace the wires when they are all that
is wrong with an otherwise good servo.
Text, photos and video by Tom Hintz
Posted – 10-31-2018
Replacing servo leads is not a good “learning-to-solder project” because of the obvious dangers to the plane and surroundings should your soldering job fail. Learn to solder on safer projects first or send the servo in for servicing. That will always be cheaper than replacing a crashed plane.
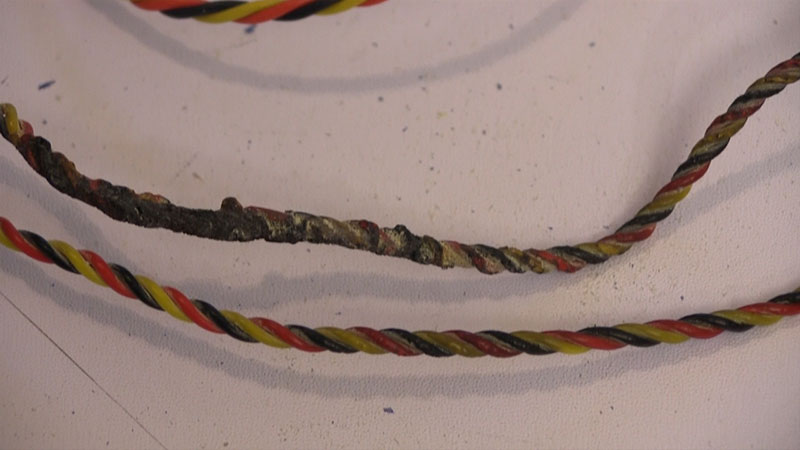
I recently joined the legions of servo-damaging radicals conjuring up new ways to compromise these remarkably durable RC components. In my case, I employed LiPo-based fire to damage the leads on a few new servos. The servos still worked, but their cables now feature flame-hardened insulation that is likely to fail in the near future. That could jeopardize my Hangar 9 RV-4 (again) so I am forced to act. The only reasonable solution is to replace the servo lead. Once again, my fallibility generates relevant content for you.
I suppose we could cut the damaged section of the servo lead out and solder in new wire. I think that just introduces more potential points of failure. Also, in my case, the damage to the leads is rather close to the servo body so doing a decent job of grafting in new wire would be difficult.
Whenever I need servo-related stuff I go to Servo City (link in Resources below) because they always seem to have what I need in stock and at decent prices. For HiTec servos Servo City lists standard duty and super duty leads with both available with male or female plugs installed. You also get to choose leads that are 4”, 6” or 12”-long. I chose the 12” cables so the servos will be compatible with more projects in the future.
Also, the new servo leads from Servo City come with the stripped ends pre-tinned. Nice touch, as is the $2.95 (10-27-2018) price for these 12” leads. At this price I ordered a few extra leads to have on hand as I doubt I am done making dumb mistakes.
Soldering is a ton easier when done with good equipment. The cheap pen-style, low-powered soldering irons may work well for splicing small wires but lack the heat-power to handle bigger soldering tasks we encounter in RC flying.
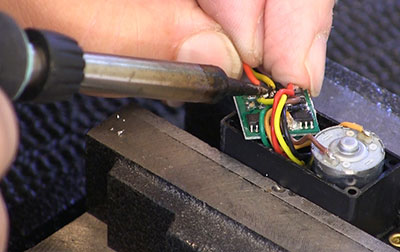
A good solder iron with a fine tip makes this job easier.
I find it helpful to use my cast iron drill vise to hold small objects for soldering. The clamping capacity is wildly excessive but with just a bit of pressure applied the servo remains stable, something that is a huge help when I try to solder small things in specific places. When working with any kind of circuit board there are lots of bad things we can accidentally solder the wires to so stability and paying attention are both on the critical side of common sense.
The screws that hold most servos together run up from the bottom to the top portion of the case. I don’t want more of the servo case than needed to “fall” apart for this job, so I apply a piece of masking tape to secure the middle and upper servo case.
Most cables enter the servo from the bottom and are soldered to the board right there. I find it helpful to take cell-phone photos of the servo anytime I encounter something that requires being put back in the correct place or in a specific order.
Because the servo lead wires are generally soldered to the board very close to each other I use a fine-point soldering tip. I also remove all three wires before soldering in the new lead. There just isn’t enough room to replace one wire at a time and get good solder joints. This is where we refer to the cell phone photo to be sure we install the new lead correctly. You can accidentally reverse a servos’ rotation by replacing the wires in the wrong order. On many servos you can burn the circuit board out by getting the wire sequence wrong, making it foolish to not take a quick photo.
Before I put a repaired servo in a plane I run it on the bench to be sure everything is functioning properly. In addition to the direction, I make sure that the servo is not heating up. I can come up with plenty of ways to endanger a RC airplane without having a servo repair fail in the air.
Replacing servo leads may not be for everyone but most people can learn to solder correctly to make such a repair possible in your shop. Doing more repairs yourself not only saves money but your turn-around time is likely way better than even a good service center.
Before trying this kind of repair, you need to be sure of your soldering capabilities. Be honest with yourself regarding your skills. We want our repairs and the planes we put them in to last a very long time.
Servo City Servo Lead Page – Click Here
Have a comment on this How-To? –Email Me!