


Text, photos and video by Bill Rutledge
Posted – 9-22-2016
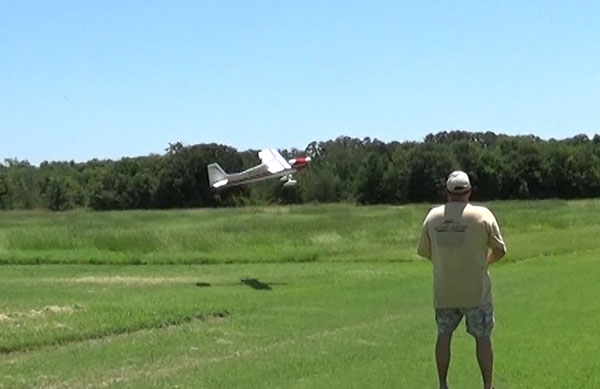
Bill Rutledge, from Texas, is a long-time supporter of FlyingRC.net who is also a commercial pilot as well as a long-time RC pilot. Bill is at home behind the controls of International airliners as well as a single engine bush plane in Alaska. He also has a wide range of RC aircraft types and is proficient with all of them.
Crow is a special configuration of the flaps and ailerons. When the flaps are fully deployed a special mix also raises both ailerons to create additional drag that allows steeper than normal approaches while maintaining normal approach speed. Though raised the ailerons continue to function normally. Crow can be very helpful when landing on short runways with obstructions on the approach path.
To be able to set up Crow there are 2 basic requirements of the model. We need separate aileron servos and a flap system that functions independently of the ailerons. The flaps can be controlled from individual servos, two servos on a Y-cord or from a single servo.
At an absolute minimum you must have at least a 6 channel receiver. Setting up Crow with a 6 channel receiver limits you to only one channel each for elevator and flaps. If your plane has dual elevator or flap servos you would have to use a “Y” harness. The more channels the receiver has the more flexibility you have. If you have a gas engine and are running an optic-kill switch that will take a channel. The plane used in this video has a 9 channel receiver with all channels used. Throttle, ignition kill, rudder, 2 aileron, 2 flap and 2 elevator servos. Each servo is plugged into its own channel port in the receiver. With today’s radios more and more people are opting for higher channel receivers and fewer Y-cords.
Setting up Crow in a transmitter is surprisingly simple. It only requires setting up the flap system and activating a single unused Programmable Mix. That is it. Before beginning you need to determine some information.
It is a given that you have two aileron servos but we need to look at how many flap and elevator servo channels will be used. Basically the question is how many channels (ports) in the receiver will be occupied with flap and elevator servos. In this example the Hangar 9 Valiant has two flap and two elevator servos and with a nine channel receiver I have room for all of them without using a “Y” harness.
Begin step one by accessing the System set up menu and scrolling to Aircraft type and click on it. Select Wing: Normal so the box blinks and scroll to the appropriate number of aileron/flap servos in your plane. In this example two Aileron and two Flap servos. Remember, if you have two flap or elevator servos connected through a “Y-Harness” the menu should show one servo. Press the “back” button left to return to System Setup.
Scroll down to Channel Assign and click on it. Write this info down or take a “screen shot” with your phone. This tells you what servo plugs into which channel (port) in the receiver. In this example the right aileron plugs into AILE and left aileron plugs into AUX1. The left flap plugs into GEAR and right flap plugs into AUX2. If you previously selected 1 Flap it will tell you to plug the flap servo into GEAR. I also note on this screen that AUX3 is unused so that is where I will plug my optic kill for the gas engine.
Step two: Click “back” twice to get out of System Setup, Click the scroll knob to get to the function List, scroll down and click on Flap System. Click on the word Inhibit so the box is flashing. Decide which switch you want to be the flap switch. I recommend a 3 position switch. In this example I am using Switch D. With the box flashing you could scroll through a long list OR just actuate the desired switch and the label will change in the flashing box to that switch. Click the scroll knob to make the flashing box go away. At this point you will see the Flap System menu and all values are 0. At this point leave all values to 0. A 0 value on this menu is midpoint of the servo travel. A value of 100 or -100% is full travel of the servo in opposite directions. By leaving the values at 0 the flaps should be about half the way down when we turn the plane on. If we set values at +-100% now we don’t know which way is up/down and it could cause something to bind.
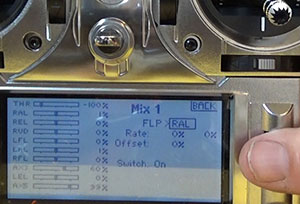
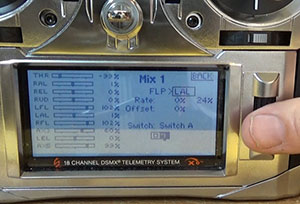
Step three: Click “back” to return to Function List and scroll down and click Mixing. Scroll down to any unused P-Mix. (Programmable Mix) In the video example we used Mix 1. Scroll until the “box” is on the word normal and click. On the Mix page you will see INH>INH. Click on the first INH and change it to FLP and click on the 2nd INH and change it to either LAL or RAL. This is the only “Mix” needed to make crow work. The difference in choosing RAL or LAL (Right Aileron – Left Aileron) is one will cause both ailerons to move together (same direction) while the other will cause both ailerons to move opposite of each other when crow is selected. Obviously we don’t want the latter. This will be fixed when we are setting up the plane. For now leave all values zero. You have one last decision to make while on this page. At the bottom of the Mix page you will see ‘Switch: On” The default setting is On. The mix (crow) will be on at all times. While flying if you select the flap switch to the middle you will get half flaps and no Crow, when you select full flaps you will get full flaps and Crow. With the Mix always on you will always get Crow with full flaps. I wanted the option to have full flaps without crow. To enable this I chose a 2 position switch that I wanted to use to turn Crow mixing on and off. Scroll to and click on the word ON after the word Switch at the bottom of the screen and either scroll to the switch name or simply flip the desired switch and the label will automatically appear in the box. This is something you can change later by selecting it or changing the switch label back to on.
At this point you need the model assembled bound to the receiver, the controls working in the proper directions and at the recommended amount of deflections prior to continuing. At this point the flaps should be at a mid-point because we left the values set to “0” on the flap system page.
With the transmitter and plane turned on go to the Flap system page. Place the switch you chose earlier in the “0” (flaps up position) scroll the cursor to the flap column under position 0), click the scroll knob to make the box flash and adjust the number to make the flaps retract. If the flaps are going down change the number in the box from positive to negative to make the flaps retract. Now that flaps up position is set move the flap switch to position 2 (flaps down). Scroll the box to the flap column by position 2 and adjust the flaps to the angle recommended by the manufacture. Make sure when the flaps are in either deployed position that their angles are identical or they can induce roll.
Most planes will require some down trim when the flaps are down. You could add some down elevator now by moving the cursor to the elevator column and putting a small number in position 1 and a slightly larger number in position 2. Make sure the elevator is actually going down when the flap switch is engaged, if not change the number from positive to negative. If you desire to slow down the operation of the flaps you can scroll to the bottom of the Flap page and change the speed from norm to about 2 to 3 seconds.
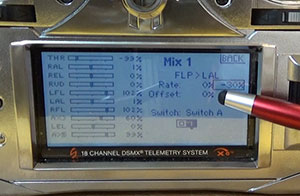
Now for the Magic. Make sure the flaps are set up and working correctly before continuing. Return to the Mix page from earlier. Crow is where the ailerons both raise when full flaps are at full down but remain centered with flaps up or in their mid-range. Beside the word Rate: there are 2 different numbers, at current both are set to 0. We only want crow mixing when flaps are full, not with them up or at half flap. When properly set up one of these numbers will remain at 0 and the other one will have a number in it. Start with the second one, put in a number large enough to see the ailerons or the monitor on left side of Mix screen move. If the ailerons are moving at flaps up make the second number 0 and change the first number to something big enough to see movement. If the ailerons are going down instead of up change the number you just set from positive to negative. At this point if the ailerons are working opposite (one going up and one going down when crow is selected) go back to the Mix and change the aileron setting from LAL to RAL. I recommend starting off with small crow and adjusting after you fly. I am only using about 12 degrees and it is very effective.
If you set up a switch to turn crow mixing on and off and the ailerons move slightly from center when you turn this mix on and off that can be adjusted out by using the offset on the mix page. Change the Offset number so there is no movement in the ailerons when you turn the mixing switch on and off with the flaps up or in their mid-position.
Start with a very small amount of crow and see you your plane reacts. Some planes might require a couple clicks of throttle or a little extra speed to flare if you have too much crow. Start small and work up. Make sure you check the controls prior to every flight and make sure you are familiar with the switches on the transmitter that you chose for flaps and or crow.
One last great feature of the DX-9 and DX-18 is Absolute Travel (Abs. Travel) found under the servo setup menu. While in crow mode, with the ailerons raised, they still function as ailerons. It is possible with crow and aileron deflection to cause an aileron to “bind” (exceed its mechanical limit). On the Absolute Travel page every channel is preset to 2048. For example, if the right aileron is binding with Crow and right aileron applied the “RAL” (Right Aileron) channel on the Absolute Travel page can be reduced below 2048 until the binding stops.
If you have a plane with plug in wings and have more than one servo lead coming out of each wing panel, color coding the connections is just good practice. It makes for a safer plane and speeds assembly at the field. If you get these backwards the ailerons are flaps and flaps are ailerons. If you have a one piece wing you will have at least 3 and maybe 4 servo connections. Color code these once the model is all set up. If you swap the ailerons (right aileron in aux 1 instead of left aileron – most likely the ailerons will be reversed and same with multiple flap servos.
I can’t stress the importance of checking the controls for movement and proper direction PRIOR to every flight on any plane you fly. I have witnessed 2 experienced modelers at our field takeoff with controls reversed in the last month. Being able to program our radios to such a great extent also opens the door for changing something we didn’t mean to. Force yourself to check the direction and function of all controls before taking off. It takes just a few seconds but can save a plane in a heartbeat.
Have a comment on this story? –Email Me!