


Text, photos and video by Tom Hintz
Posted – 9-9-2016
In the past the best thing I could say about how I cut my airplane cowls is that I usually had plenty of exhaust area to let air out of the cowl. I just was not very accurate when cutting reliefs around things that stuck out through a cowl. Since being diagnosed with Alzheimer's one of the things I have had to do was to develop my own way of doing things to minimize the impact of my deteriorating short term memory and somewhat declining hand to eye coordination.
Before we can start laying out all of the cuts we need to get the cowl mounted in its proper position. For that things like mufflers and other equipment that protrude through the cowl must be removed. I make strips of cardboard each three inches or so long for each of the cowl mounting screws. I make a small hole near one end of the strip and thread a mounting screw through each strip. Start each screw in its blind nut, stretch out the cardboard strips horizontally towards the tail and tape the strips down and remove the screws.
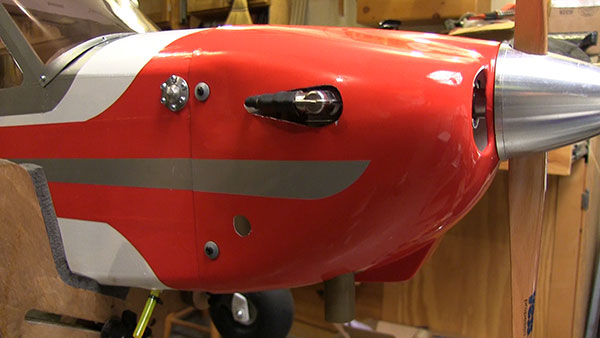
The cowl gets slipped into place (or close) before the spinner with its back plate is installed on the prop shaft. One of the hallmarks of a good cowl installation is a small, consistent gap between the cowl and the spinner back plate. I have found it easiest to cut some thin balsa so that it covers most of the spinner back plate but with a horseshoe-like cutout that lets it slip down over the engine housing directly behind the prop washer. With that balsa “shim” in place I pull the cowl up against the back side of the shim, get the nose of the cowl aligned with the spinner back plate and then tape the cowl to the spinner to hold that alignment. On some cowls I also add pieces of tape between the cowl mounting screws to help prevent it from moving.
Now I can bring the strips of cardboard forward and mark the screw locations on the cowl. Remove the cowl, drill those mounting screw holes and put the cowl back on, this time using the mounting screws. Confirm the fit between the cowl and spinner back plate and make adjustments if needed. When satisfied with that we can move on to making the openings for the mufflers etc.
First, let me say that I cannot claim to have “invented” this system for cutting cowls because I suspect others are doing it the same way, probably to enhance their accuracy as I am trying to do. I can say that this approach to cutting cowls has helped me a bunch and saved large sections of my cowls from disappearing unnecessarily.
The big change to how I approach cutting a cowl is that I trace obstructions that require cutting part of the cowl away. In the past I had taped cardboard to the fuse, laid it over the obstruction and I would start cutting the cardboard away to create the clearance I thought I needed. The problem is that I never got the openings nearly as accurate as I have been able to when tracing the part that sticks through the cowl beforehand.
The other thing that “my system” allows is for me to use straight edges so opening with straight edges actually come out pretty straight. It is also easier to extend things like elongated exhaust slots that are necessary to slip a cowl over the muffler down tubes or extensions. Now I can make a nice looking, concentric opening and make far cleaner cuts when removing the necessary material from the template. Now I can draw out the needed opening cleanly and cut out the material necessary to create a clean, even opening that can be traced onto the cowl. Then I can place the template on the fuselage with far more precision because I am working with the finished opening which I can now align front to back and side to side much easier than before.
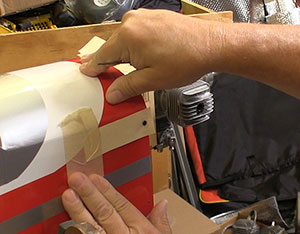
After taping the template in place I often put a wide strip of masking tape over the area to be cut out to make seeing and following the traced outline easier. The color of some cowls make following a thin traced line very difficult. Trace the shape onto masking tape and it is much easier to see and follow.
One thing “my system” does not do is make the cutting of a cowl much faster. I am wasting less time so I am getting done a bit sooner overall. However, to get a cowl placed and cut accurately still takes some time including having to remove and replace things like mufflers a time or two to develop the template and get the cuts laid out on the cowl. Then the cowl itself needs to be fitted to be sure we have the necessary clearances and that we can actually get the cowl on and off with some degree of ease. Of all the cowls I have cut the Hangar 9 Valiant 30cc, the one used in this story, is the hardest to put on as the spark plug wires have to be brought through their openings in stages as the cowl is slipped over the engine. I could make this installation easier with considerably larger openings for the plug wires but that would not look nearly as good or clean as the opening that more closely follows the shape of the plug wire cap.
In the end my “Special System” is probably very familiar to lots of you out there and I hope it works as well for you as it does for me. I have a reputation for being awful at cutting cowls and have the cowls that justify that. However, my Hangar 9 Valiant 30cc cowl marks my breakthrough and shows that even I can come up with a “system” that lets me be far more accurate and actually produce a cowl that looks good. Feel free to call it “Your System”. I’m not charging royalties or anything.
Have a comment on this story? –Email Me!