


If you fly RC planes long enough there is going to be an accidental landing now and then. The good news is
many crashes can be repaired.
Text, photos and video by Tom Hintz
Flight video by SoloShot 3
Posted – 8-28-2018
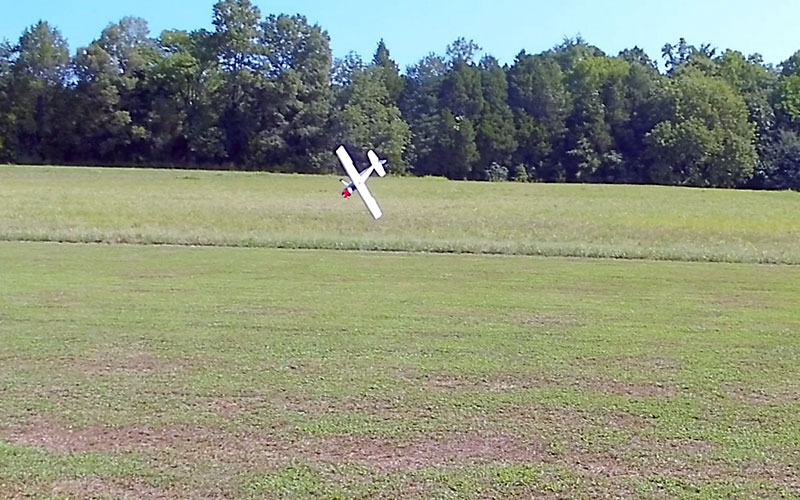
One of the virtual certainties in RC flying is a degradation of a pilots’ common sense when someone points a camera in their and/or their plane’s direction. My warts and all theory on presenting content demands that I admit to experiencing such an ego explosion. Compounding my culpability is the fact that I was using a robotic video camera, that I had set up and turned on. My bad all around.
It was during production of the Review of my SoloShot 3 that my ego-flare caused me to fly my Hangar 9 30cc Valiant into the ground, albeit slowly. That gentle cartwheel produced two breaks in the tail section structure. The only other obvious damage was the “smooshed” (RC-specific damage descriptor) prop so there was hope for my favorite plane.
In the midst of my sorrow (everybody whimper for me) I realized that I had not done a story on repairing an ARF (almost ready to fly) airframe, mainly because it was so much easier to order the needed components, jack up the radio gear and re install that equipment in the new component. Looking up the cost of a new fuselage for the Hangar 9 30cc Valiant sealed the deal – you get a new How-To story!
Seeing that there was no way to fix the Hangar 9 30cc Valiant tail section without opening/removing some of the covering I ordered the three colors that make up the Hangar 9 30cc Valiant color scheme. Ultracote in White (HANU870), True Red (HANU866) and Silver (HANU881). FYI: I’ve never been the worlds best at covering so I might fight this as long as I can stand it, then try to con a friend into showing me/us how it is supposed to be done.
Just because I can see damage to the fuse behind the wing does not mean that is all there is. The wings were given a close look as were everything else on the plane. Damage-causing forces can be transmitted far from the point of contact in large part because of the rigidity of the structure. That means we must look everywhere for damage to prevent something very fixable getting by and helping the plane disassemble itself in the air.
Not all damage is easily seen. Some investigating
can save big problems later.
Despite the “smooshed” prop, the firewall and surrounding structure was undamaged. Even the spinner was fine, as was the cowl. I looked behind the firewall in the fuse structure and could find no cracks or loose joints. The front of the Hangar 9 30cc Valiant fuse is tough and that part of the crash impact relatively light.
The cabin around the wing was also in fine shape. I could not separate any joints, find any cracks or busted stuff. The wing panels themselves were checked right after the crash then again in the shop, more closely this time. Again, no damage was noted to the wings themselves.
When I checked the wing tube I found a very small bend that was difficult to see even when the tube was rolled on the floor. I was able to find a small bulge in the side of the tube that obviously indicated a distortion. Fixing a wing tube is virtually impossible so a new one was ordered and the damaged one smashed (“smooshed”) to be sure I nor anyone else tries using it.
The most visible damage is in the tail section behind the wing. I ironed the covering down to the structure around the upper damage point to prevent it from pulling away when I cut the necessary section out to access the upper break. Hopefully, that will make re-covering that area easier later.
When I opened the covering my day got better. The airframe is broken along the top and bottom rail, but the structure remained essentially straight, so I just had to be careful not to “repair in” a misalignment.
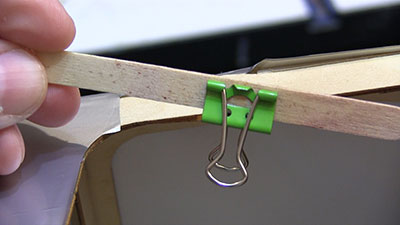
I use small clamps like this to hold a piece of repair
wood in place while the glue dries, usually epoxy
in an airframe repair.
Both frame breaks will require some piecing together, but I doubt that alone will not be strong enough. I didn’t have any lite ply on hand but did have a huge jar of wooden sticks from frozen fruit bars that I am addicted to. The sticks are light, tough and the right size, so I epoxied one of them inside each internal face of the framework straddling the broken area.
The sticks were left at their full 4-1/2” length to help spread the forces over a larger area within the structure. I used good epoxy, roughed up the surface of the sticks and applied small spring clamps to press the sticks to the frame, straightening both in the process. Where needed I also fitted pieces of thin hardwood for structure or thin balsa to help “smooth” the area around the repair. There was little of this “piecing together” needed.
I have no illusions of my repair skills suddenly improving to where I can make an invisible repair. However, I have been making durable repairs for a long time. I hope this “fix” on my precious Hangar 9 30cc Valiant will be my strongest yet. I need this plane to last forever, maybe longer.
It took one full day to fix the Hangar 9 30cc Valiant and those who check out the covering closely (or from across the street) will see my lack of covering perfection. But they will have to look quick because my trusty Hangar 9 30cc Valiant will be going back in the sky the next time the weather, daylight and myself are all available at the same time.
Most of this repair cost lies in the covering I bought. Much of that is on my shelf for “just in case” in the future. I needed only two pieces approximately 6”-square, one silver and one white. The pieces of wood I found in the shop, and the adhesives used add pennies to the cost.
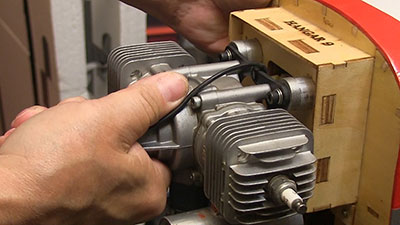
The engine mount/firewall can get stressed in even
minor crashes so check that area closely.
Of course, the repair can’t be considered a success until we see if my precious Hangar 9 30cc Valiant flies as good as it did before “the incident”. In keeping with my “warts and all” theory of producing stories for FlyingRC.net I dutifully set up the robot camera operator to record my attempt at flying the Valiant in its post-crash, repaired state.
No other changes were made to the Hangar 9 30cc Valiant other than replacing the smashed prop with an identical Vess 20B like I always use on this plane with the DLE 40-Twin. Balance was checked, and the CG found to be right where it is supposed to be, so my repair was light anyway. We will see about strong.
The first take off with the repaired Hangar 9 30cc Valiant was probably the most surprising of this sequence of events. The Hangar 9 30cc Valiant flew straight and true from the time its wheels lifted off the runway. I didn’t even have to make any post-repair trim changes. It flew just as it did before I flew it into the ground and then repaired it myself.
During the four flights I put on the Hangar 9 30cc Valiant through its paces on its first day back from the crash. I was confident my repairs were strong, but I was focusing on the tail section as I pulled it through maneuvers I thought might load the repairs. No problems at all.
I was secretly amazed. I had fixed crash damage and had not compromised the handling that I like so much in the Hangar 9 30cc Valiant.
The most painful cost in all this is to my ego. After all, it was my showing off for my new camera system that caused the damage in the first place. People think that I will “learn” eventually and every time I have an “incident like this I do learn a little more. That does not mean limiting my flying to high, straight and slow. We can do lots of fun stuff without being stupid in the air. Being able to make repairs like this just mean we can fly more, sooner and in many ways, cheaper.
DLE 40-Twin Review – Click Here
Original Hangar 9 30cc Valiant Review – Click Here
Have a comment on this How-To? –Email Me!