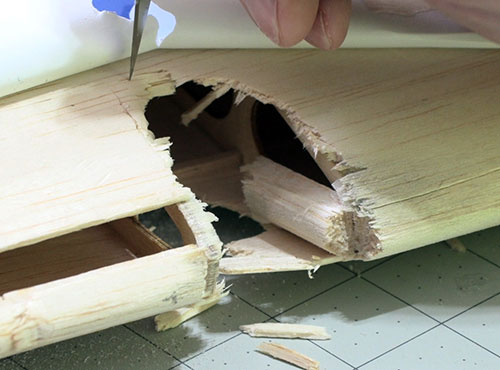
Damage like this can look awful but in many cases it can be repaired. The key is it
didn't involve rib or spar damage.
Text, photos and video by Tom Hintz
Posted – 4-6-2020
In my “Old Eyes and Young Trees” story the ease with which I can damage a lightweight, balsa and light ply airplane is depicted. At the time of that incident a replacement wing was available but cost about $95. While I am certainly no repair wizard, my ability to subtract from a nearly non-existent RC budget demanded that I attempt to fix this wing.
The Tools
CA adhesive and a hobby knife are obvious tools needed for this kind of repair. However, the way some of the pieces were collapsed inward on the wing meant I needed a way to pull them back out to as close to their original position as possible. The hook-shaped tool I use is from my vinyl-cutting machine and used to weed vinyl from around the cut letters or shapes. A bent piece of steel wire with a sharpened point might work as well. I already had this tool in the shop.
A razor saw is also a common tool in RC shops. I used the saw for cutting pieces of balsa precisely enough to fit into areas from which I had cut crushed balsa sheeting. This type of saw cuts cleanly and does not need to be plugged in.
One of the tools that helps a bunch is a rigid sanding bar. Mine is over 30 years old and its metal sanding surface is showing its age but still works fine on modern-day ARF (almost ready to fly) planes. The 12” length of the flat surface makes it a bunch easier to level the repair areas with the surrounding surface.
Something else that was commonplace 30 years ago and is now may be out of production is Balsarite. We use this liquid to treat the exposed wood to help adhesion of the covering. It also tends to harden the wood a bit and helps protect it from fuel contamination though fuel is not a big concern here.
The only real downsides to Balsarite is it stinks big time so it must be used with plenty of ventilation. The other is that once you seal covering down on a Balsarite-treated surface, it is not going to come back off easily.
Open it Up
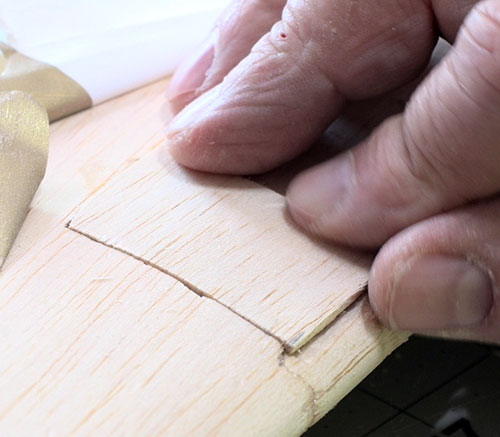
I pieced the leading edge together then cut the holes out so they were more uniform
so I could make patches more easily.
Back in my stick-building days 30 years ago RC’rs routinely fixed damage because there were no spare parts. I learned back then that when opening the covering to make a repair, open enough to see what you are doing. Trying to keep the amount of covering opened to an unreasonable minimum only serves to complicate the repair.
The same philosophy applies to balsa sheeting around the damage. While this kind of repair is often called “piecing it back together”, that technique applies more to structure than the sheeting that covers it. Often it is easier to cut away a bunch of smaller, broken pieces of balsa and make up a fresh piece to fit into that opening.
I find it helpful to cut small pieces of balsa and glue them partially under the edge of the opening to act as a support for the sheeting piece to be installed. This might add a little strength, but it is intended to make it easier to get the new sheeting better aligned with the surrounding surface.
Filling Low Spots
Try as we might, there likely will be some low spots in the repair. While spackle is an option for shallow low spots, I like to use scrap balsa whenever possible, especially when plugging small holes or gaps. Using the sanding bar as a gauge, I locate and fill the low spots with pieces of balsa, sand them flush with the surrounding surface, then repeat the process until I am satisfied that everything is reasonably level.
CA glues have made this process a ton easier than in the aliphatic resin (often called carpenters glue) glue days. With the old glues the repair completed for this story in a few hours would have taken days if not longer.
Glue and Dust
Another technique for filling smaller gaps comes from woodworking. If you push a bit of glue in a crack or gap, then sand the area around it, some of the wood dust generated is embedded into the glue. That makes a stronger bond that is close to level with the surface. I use medium CA for this method, so it accepts the wood particles before it sets up.
Recovery
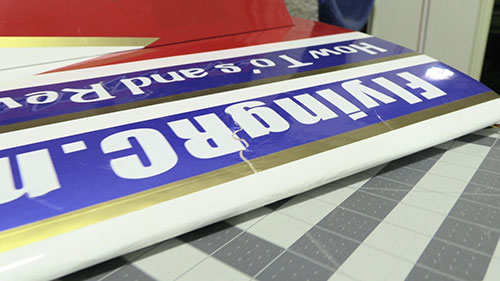
Even though my covering skills suck, the finished wing looks pretty good if you don't
get too close!
For those not familiar with my covering skills, rest assured I have none of which to speak. I managed to prove that once again in the completion of this repair.
The covering had torn at each of the impact points and I decided to extend those tears with cuts that allowed me to pull the covering back far enough to fully expose the repair areas. The folks out there with an aptitude for covering already know this is not going end well. I probably should have slit the covering a little below the leading edge and peeled it back that way. But, I didn’t and that set me up for another covering fight.
I tried to carefully lay the covering back down with my heat iron on the mid-range heat setting. While the covering did stick well onto the Balsarite-prepared surface, some cracks remained. Seeing as how the covering had been shrunk tight, the splits at the impact points naturally opened farther than I could close when putting it back down. I did not have covering in all the colors, so I was stuck with most of the cracks exposed. I did have white covering on hand so was able to cut strips of that and apply it over the leading edge to seal the cracks in the original white covering.
In the end, I am confident the covering will not fly off in flight, and while its not flying off up there, the repair looks pretty good. Get up close and my covering deficiencies are easier to see. The real world is not kind to the covering-challenged amongst us.
Conclusions
I was able to fix my 3D Hobby Shop 75" Edge 540 and return it to the air with confidence. I’ll have to crank off a few snap rolls to really test the strength of the repaired wing. I am not able to feel any torsional movement in the repaired wing panel so do not think the structure is compromised.
Doing the repair, when materials are considered, saved me about $90 overall and that is important when the RC budget is laughable on a good day. While the folks at 3D Hobby Shop usually have a good stock of replacement parts for their planes, I was able to get my Edge back in the air sooner than I expected. Plus, I didn’t have to wait on a part to be shipped to me.
It is important to note that not all damage can be fixed safely. I did this repair because I could clearly see that none of the ribs or spar area had been impacted. I could not find flex in the wing panel that might indicate a hidden break. Plus, I know the impact was not severe. If the damage would have involved any of the internal structure, I would have stomped the wing panel to death and ordered a new one when the budget allowed. I do try to not be stupid with my planes.
All Flyingrc.net written, photographic and drawn materials are property of and copyright by Tom Hintz and Flyingrc.net 2013-2021 Materials cannot be used in any way without the prior written permission of the owner.