


Using Spektrum's "fmodes can make your plane easier to land or to do other specific maneuvers.
Text, photos and video by Tom Hintz
Flight video by Clark Ponthier
Posted – 6-17-2018
One of the things I like about the modern Spektrum computer-based radios is the simplicity of doing complicated things. One that I use on all my gas planes is the Flight Mode (F-Mode) system. Virtually every plane I have flown had little characteristics that need trim changes to make the plane a fly straight and level or to be more predictable in the current weather conditions. Flight Modes simplifies keeping up with those changes while allowing us to focus our attention on flying the plane which can be a huge cost-saver if it prevents driving that plane into the ground.
Flight Modes let us assign specific channels to this system, so the transmitter remembers trim changes made to those channels whenever that model is selected. Any future trim changes are also remembered when the transmitter is turned off or a different model is selected. When that model is selected the next time, the trims saved in Flight Mode enabled channels are loaded just as they were the last time you flew that plane. All this is automatic once set up and does not need input from you other than clicking in new trims when needed.
I normally enable Flight Modes on the Throttle and Elevator channels and assign Flight Modes to the B, three-way switch atop my Spektrum DX9 transmitter. You can assign Flight Modes to whatever switch you have available or is most comfortable for you to reach.
Flight Mode 1 – B-switch towards the rear of the transmitter, is used primarily for landings, touch-and-goes and some planned slow-moving maneuvers. In Flight Modes 1 I set the idle a bit lower than used for general flying or aerobatics. Many of today’s planes have remarkable glide characteristics and slowing the idle a bit helps “brake” the approach speed. I also trim the elevator so that at the reduced power and speed the plane flies with the nose down just a little bit. That helps prevent a very common type of stall and it forces me to hold just a touch of up elevator as the plane reaches the ground, which I am most comfortable doing.

I have found it easiest to set all my Fmodes to one
switch to keep things simple.
Flight Mode 2 – B-switch in the center position for general, normally faster flight. I trim the plane to fly straight and level at speed, usually by trimming the elevator alone. Rudder and aileron changes at speed generally need mechanical adjusting of those control surfaces. I also trim the throttle up approximately 100 RPM in my Flight Mode 2 to help prevent dead sticks when I chop the throttle during some tumbles and other aerobatics. This Flight Mode sometimes needs extra trimming when conditions change. But, because the transmitter remembered the trims from the last flight needed trim changes are usually very small.
Note: If you are working with an electric-powered model remove the prop! Programming transmitters presents an opportunity for a mistake that could start the prop unexpectedly!
Setting up the Flight Modes is surprisingly easy once you see the process. It takes just a couple minutes, but you do have to repeat the setup process for each model on which you want to use Flight Modes. Once set, that model needs no further programming for Flight Modes unless you want to add or remove a control channel later.
Go into the Flight Modes Setup in the transmitter. We can choose two switches with up to 5 Flight Modes for fixed wing planes assigned to them. This offers lots of versatility, particularly with larger models that may have a bunch of channels. I use one switch for my Flight Modes, usually the “B” switch as it is comfortable for me to get at while flying. After selecting the switch, you can see the screen change as you move it through the three positions. Three Flight Modes are available by default when enabled but you do not have to use all three.
Click on NEXT and we move to the screen where switch positions are identified. You can alter the positions if desired, but I leave them in the default order. When satisfied with the switch and the Flight Mode assignments click back to the main “List” screen.
Following the screen prompts is easy, as is adjusting
Fmode settings later.
Next, scroll through the list and click into the “Spoken Flight Mode” section. Here we can select how the transmitter “announces” the selected Flight Mode in that switch position. There are a bunch of spoken options available within the transmitter that require some hunting, but you can personalize it if desired. By default, it announces “Flight Mode 1, 2 or 3.ere we can choose how the transmitter “announces”
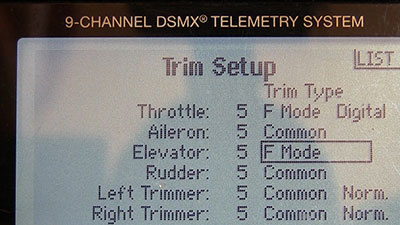
Go back to the main menu and click into the Trim Setup menu. You will see a list of all the controls that can be assigned to a Flight Mode. I normally enable Throttle and Elevator for my simple Flight Modes. You can add more depending on what you want Flight Modes to do for you. I am only establishing Flight Modes for landing and normal flight configurations.
To add a control to Flight Modes, scroll down to that control and over to the Trim Type column, click on that and use the roller button to change that entry to Flight Mode. That’s all you must do.
In the Trim Setup we can also change how each click of the transmitter trim tabs act. The default is 5, how many actual trim steps that are added with each click of the trim tab. Think of how we change Sub Trims in the servo screens where we make changes one step at a time. This trim setup allows us to make trim changes coarser with 10 steps per trim click being the maximum allowed. We can also reduce the trim to 1 step per click. Reducing the number of steps made when the trim tab is clicked can be handy when it seems we cannot hit the trim needed exactly but rather go too far with a single trim click. I have played with this adjustment some but so far, always go back to the default 5 value. If you choose to alter this setting, make small changes! It is never a good idea to change the way the plane handles in big steps.
With the programming complete, the transmitter remembers the trim changes made on those channels. Whenever you select that model again, the last trim settings are automatically loaded and, whenever you make trim changes in the future they are committed to memory until you change them again.
Most trim changes after the model is initially set up will be small. I find the main cause for these changes to be substantial temperature swings. To a lesser degree, higher winds might make adding a couple more clicks of down trim to the elevator a helpful change.
Flight Modes are a simple way to make flying our models a little easier and more predictable. This isn’t a gyro or other “cheater” device some in the RC community look down on. All planes need a little trim help now and then and the Flight Modes system makes that easier by automatically “remembering” trims for when we fly this plane again.
Have a comment on this How-To? –Email Me!
Back to the How-To’s list – Click Here