


If cheap is your motto, making your own wing bags may be of interest.
Text, photos and video by Tom Hintz
Posted – 9-1-2015
Over the years I have seen RC airplane wings show up at the flying field in everything from purpose-made wing bags to coats, blankets and some other “things” I feel better not knowing too much about. With the RC community being top heavy with creative types it didn’t take us long to loosely copy the free wing bags shipped with some ARF planes imported from the Pacific Rim. No doubt someone having found these silver wing bags in an ARF kit happened to notice what appears to be the same material is available and the home made copies of the Pacific Rim quilted aluminum-looking wing bags were born.
First, let’s be clear about what we are doing here. Our home made wing bags are meant to offer a bit more protection than nothing to protect wings from minor dings usually suffered during transport in our cars or trailers. These homemade versions do not offer the padding of commercial bags, nor the zippers or brazen “look what I got” logos. There is a good chance that our sewing will be sub-par and complexity should top out at adding hook and loop closures that might even stay attached.
The material I used is sold under the Reflectix brand. I got a 24”-wide by 25-foot long roll for about $25. It is a quilted Mylar-looking material that is roughly ¼”-thick with bubbles of air sealed into the plastic liner. It is the bubbles of air that give this material its insulating qualities and cushion our wings. Because the bubbles run right to the edge they also cause a problem for us on the sewing machine.
Killing all those little air bubbles is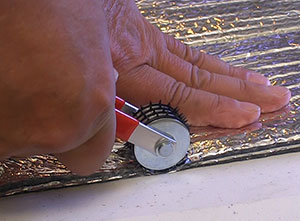
mandatory or the whole thing can fall apart.
To avoid frustration (and looking kind of dumb) we have to first pop all of the bubbles along the edges to be joined. Top Flite makes a tool called the Woodpecker that is meant for perforating sheeted structures for covering but it kills a nice width of bubbles in this insulation just as well and that is way better than any other tool I could find. The Woodpecker costs like $16 and might be a good thing to have if you do covering anyway.
To better finish the sewn edges I added a binding tape that makes for a cleaner, much tougher edge. The edging I used is 7/8”-wide double fold bias quilt binding tape from a fabric store.
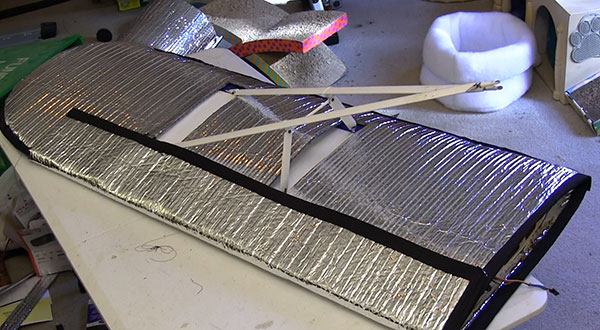
In the accompanying video I made wing bags for my Hangar 9 1/4-scale PA-18 Super Cub. I leave the struts assembled on the wing because they fit in my trailer that way and saves a bunch of assembly time at the field. The struts meant that I had to get creative with one side of each wing bag, and that I needed to make a left and a right.
I began by tracing the wing tip down to the beginning of the aileron. From that point I turned straight out to the edge of the Reflectix because this way I had lots of material to work with when engineering on the fly as way to close the bag around the struts later. (Not a lot of planning ahead here.) I then cut four pieces to length and trimmed the rounded wing tip ends on all of them.
Using the Woodpecker I prepped the square end, long edge and wing tip edges of all four pieces. I could then carefully stitch two panels together along the long straight edge and rounded end to form the basic wing bag. I then went back over the stitched sides and applied the binding tape. At this point there is no left and right.
Now I have to make the cuts that will make one a right and the other the left wing bag. I decided to finish one wing bag, put the wing in it and then make the other one using the techniques I figured out on the first one.
I’d like to say I had a highly technical method of laying out the cuts for the struts but the reality is I eyeballed them and followed the natural lines in the Reflectix made by the rows of air bubbles. The openings for the struts may have turned out larger than need be but it works. I can get the wing in and out of the bag easily and it is protected well for how they are carried in my trailer. <
After making the strut-clearing cuts I trimmed the edges of the resulting flaps along the edge of the ailerons and flaps. This will allow folding the other side panel over the edge to secure the wing. Again nothing fancy but it works. I finished the edge of the flap with the binding tape just to protect that raw edge as it is always exposed.
I also left the root end of the bag open because for my application there is no need for a flap there. If you want to be able to close that end of the bag just make it a little longer so you can trim one side and fold the other over to close the end. If you find that you just like sewing you can finish all edges of the Reflectix material with the binding tape but I don’t think there is a need for that.
To make closing the wing bags simple I used sticky-backed hook and loop material. I put the two sides of the hook and loop together and cut strips roughly 1” by 2-1/2”, the width of the material as it came. Remove the protective tape from one side and stick the pieces to the flap an inch or so in from the edge. With two pieces applied to align with each flap I removed the protective tapes from all of the pieces, folded the flap over and pressed them into place. Then when I opened the flap the hook and loop material stays put and everything is lined up.
The wing bags I made are cheap, relatively easy to make (the sewing is the tough part) and do a good job of keeping my Cub wings looking good. More importantly for me is that I could make the bags the way that best fits the way I transport them. I like leaving the struts assembled because that makes assembly and tear down much faster at the field, plus my trailer accommodates the wings that way.
Making my own wing bags let me “design them” around the struts and save a bunch of money in the process. The down side to making wing bags like this is that you need a sewing machine and you have to figure out how to use it. Once you get over that part of it, making wing bags is fun and cheap, two words that seldom go together in RC flying.
Have a comment on this story? –Email Me!