


I started making my FlyingRC.net Wing Bags and Protectors because I couldn't find what I wanted. Naturally
this endeavor got way out of control instantly but now I have the equipment and experience to build bags I am
confident in and pilots like, in bunches.
Text, photos and video by Tom Hintz
Posted – 5-21-2019
When I got fed up with “hangar rash”, those little ground-incurred dings (and some bigger ones) I started looking for protective coverings. I found several types on the market but couldn’t find any with the combination of features I wanted so I decided to make my own. That turned into a major effort which morphed into making them for you also.
One of the first things I discovered was buying fabrics locally is can be limiting and expensive. The local fabric stores that remained open understandably had lots of fabrics for clothing but little that I liked for making FlyingRC.net Protectors. Finding them on-line wasn’t much easier and the outlets that did have what I wanted had minimum yardage buys required to get a better price. I discovered that a better price still isn’t cheap for quality fabrics.
Because I wanted to use a three-layer “fabric sandwich” finding all three materials in one place was impossible. Conceding the point and buying materials on-line let me develop sources that I could count on, most of the time.
The outer shell of all FlyingRC.net Protectors is made from canvas. That provides the durability I wanted along with a decent selection of colors. I would find that the normal 60” width of canvas on rolls came in handy when trying to cut protector components in one piece.
The center of the FlyingRC.net Protector “sandwich” is a spun padding that also comes in widths that I can cut the necessary parts from in one piece. Buying canvas in bulk at those widths gets pricey but overall it does lower my costs somewhat.
The inner layer of the fabric sandwich is made from flannel. I like this because it is non-abrasive to the point that some users say it polishes their covering during handling. I wanted the non-abrasive quality, whatever polishing it may do is a bonus.
From the beginning, using heavy-duty zippers was mandatory. Of course, nobody makes zippers in the lengths I needed. The only legitimate option was to build zippers myself to fit the protectors I designed. I could buy good quality, heavy-duty zipper in bulk and use the same zipper for all lengths I needed. Of course, that meant learning to “build” a zipper component that could be sewn into the protector. Building zippers myself let me to vary the zippers finished width to adjust the width of the protector. The process of building zippers is labor intensive, but I like the finished product and it is way cheaper than having a factory somewhere build all the different length zippers I need.
One of the better “brainstorms” I had was appreciating the benefit of making durable templates. Being able to trace out the components made the process faster but more importantly brought consistency to the process.
Along the way I developed a system of margins that allowed me to design a component set from tracings sent to me by a customer. I intentionally design FlyingRC.net Protectors to be on the loose side. I saw the resulting distortion of a wing stuffed into a slightly under-size wing bag. We have plenty of ways to damage our planes, I’m not going to contribute to that by “cheapening out” on a bit of material.
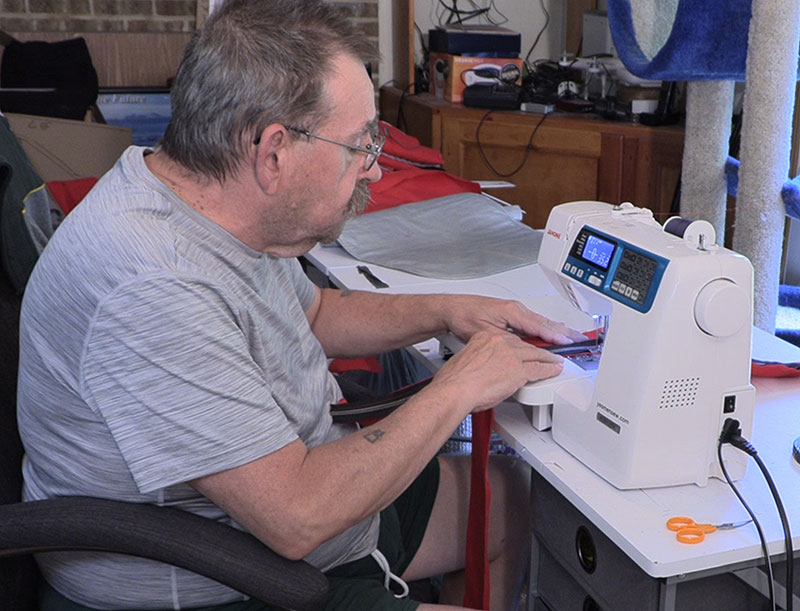
It didn’t take long for me to realize that I needed more sewing horsepower than our 40-year-old JC Penny’s machine offered. I didn’t need fancy machines or hundreds of stitch patterns, but I did need durable machines that I could depend on daily.
Sergers were a type of sewing machine I didn’t know about. I soon realized the need for finishing edges within the FlyingRC.net Protectors that a serger provides. The serger uses four individual threads, at the same time, to bind the raw edges of a seam. I use a serger every day and still have no idea how it manipulates four threads, but it does. As with any machine, a better serger is more dependable and lasts longer than a cheaper model.
Making FlyingRC.net Protector Sets was never a get rich quick plan and that is working out. The profit I do make helps pay for operating FlyingRC.net. Virtually everything you see in my Reviews was paid for by me. So, the FlyingRC.net Protector Sets let you prevent hangar rash and I can keep the flow of content coming.
Visit the FlyingRC.net Protector page - Click Here
Have a comment on this story? –Email Me!