


Modern radios give us systems allowing the fine-tuning of our planes to make them easier and more fun to fly.
Text, photos and video by Tom Hintz
Posted – 6-6-2018
Warning! – If you are doing this programming on an electric-powered plane REMOVE THE PROP! We aren’t involving the throttle channel directly but there is always the chance of bumping the throttle stick so get rid of the prop until you are ready to fly it!
I’ve been getting quite a bit of email asking how I put the rudder, elevator and aileron dual rates and expo on one switch, something I have been doing since the first computerized transmitter. I am more concerned with how so many of you know I do that. Either I am mentioning it in videos or somebody is spying on me…..
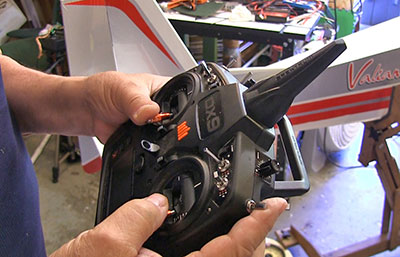
This How-To is based on the Spektrum DX9 and much of the programming works on the Spektrum DX8 and maybe other Spektrum transmitters. I have no experience with other current radio brands so can’t speak to doing this on those transmitters or even knowing if they are capable of this programming.
There is nothing wrong with using individual switches for your dual rates and expo if you like. I know some very good pilots that keep the dual rate and expo settings on separate switches because that better fits their style and what they want to do with those parameters. We all have different likes in how a plane handles and there can be big differences between planes as well. You must do what is most comfortable for you and for many that does not involve all the dual rates on one switch. One switch per control surface dual rate/expo is legal, honest.
I do this “all on one-switch” thing because it lets me have three distinct configurations I can select while I am flying. Though I seldom use the two lower deflection states having them available if something goes wrong can save an airplane. The one switch concept also lets me to use one switch position to try more radical parameters with the safety of being able to flip the switch to fall back to a known configuration.
I “grew up” in RC using full throws on all control surfaces but that is strictly my preference and I am not advocating everyone else try it. Always start with the plane manufacturers recommendations for control throws and get used to them so you understand how the plane flies. Once that baseline is established you can use one of the switch positions to experiment with more aggressive setups in flight and be able to flip back to a more docile configuration for landing.
First, go to the Monitor screen and flip the switch you want to use back and watch the screen to see what values are changing. We need to know that using a switch isn’t impacting something else that could endanger the plane. A two-position switch can be used but with so many three-position switches on today’s radios, there is no reason to limit ourselves in most cases.
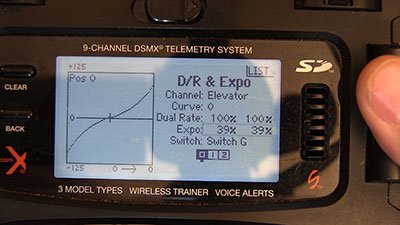
Setting up dual rates is simple and remains adjustable
so you can continue to fine-tune the way your plane flies.
I use the G switch (upper right) on the Spektrum DX9 because it is easy for me to reach and can be used without conflict with other functions. Also, I always set the G switch up so that with the switch in the rear-most position I have my highest rates with the remaining forward positions having progressively lesser settings. You can set the switch up any way that is most comfortable for you.
If you are not familiar with using a transmitter switch while flying, particularly if you are new to the hobby, try to pick a switch that is most comfortable for you. Practice is the only way to develop that comfort level and for most, it doesn’t take as long as you might suspect. In moments of panic, you want to be reaching for the right switch.
As with the rest of this How-To you must decide what dual rate and expo settings are best for you. I list my initial settings here only to show the pattern of the programming. You should enter the values you think best for your situation, plane and skill level at that moment. I strongly urge new pilots I teach to use this dual rate/expo setup for use as a learning tool. They can set a new plane up per the kit instructions to get familiar with how the plane flies. Then they can slowly add more control movement or reduce expo on one of the switch positions (or both in small steps) as they become more comfortable flying that plane.
The dual rates and expo need not be the same from ailerons to rudder to elevator. I use consistent values as a starting point for all my new planes then modify them as needed as I build flight time and recognize input changes that would help the plane do what I am looking for.
I always assign the first dual rate/expo configuration, full throws. with the switch in its rearmost position. The middle switch position has reduced throws and the third, forward most position has the least control movement and sometimes the highest expo. I use these switch position assignments for every plane I fly for consistency. There is enough brain-tasking when flying a plane normally. When something happens, and I need to reduce a planes sensitivity, my fingers (muscle memory) know what switch I need to flick to change throws if that is what is needed.
I always have the highest control surface deflection in this switch position. The elevator, ailerons and rudder are all at 100% with 40% expo. On most of my planes I set the control surfaces up mechanically to get all possible throw. Remember that I have been flying planes with extreme control surface throw for a bunch of years and have had a long time to get accustomed to the sensitivity. For more normal setups, use this position for the plane manufacturers “high rate”. You can always increase deflections later after getting a feel for the plane if you want it to be more active.
I put all three dual rates on the same switch just
because it is comfortable for me.
I generally reduce all throws to 70% but leave expo at 40%. This position is where I find myself tweaking the control surfaces to different dual rate and/or expo settings. Some planes have a hyper-active rudder or ailerons or elevator so reducing that throw more than the others can make the plane more comfortable to me.
The middle position is often my “test bed” after I get some flight time on it. I try new settings knowing that I have two other configurations to go to if need be. Once I find the values I like best, I move them to the Position 1 setting. Then, I will again set the Position 2 values to 70% on throws and 40% expo.
This is where the lowest control surface movements live. I will program this position, so all surfaces have 50% throw and 40% expo. Some planes need greatly reduced throws for very precise flying or to calm down a hyper-sensitive plane for landing. Here again, you may find that one or more control surfaces need to be reduced below 50% or they just feel better at 55% throw. You must find the throws at which you are most comfortable flying that plane as your experience flying it grows.
Setting up a single-switch dual rate/expo system is easy to do and easy to use. Though nothing is for everybody I believe this bit of programming can be helpful for many beginner and veteran pilots who haven’t tried this setup in their transmitter. The complexity of todays transmitters can be harnessed in ways we only dreamed of not so many years ago. Spektrum’s dual rate and expo system is an example of how simple once complicated programming has become.
As always, keep safety in mind when making changes to your transmitter. Before flying a new setup try all the switch positions to be sure the changes to the planes control surfaces are exactly what you wanted and are moving in the right direction! Also, always have one safe switch position that takes you back to the original plane setup in case you go a little too far. It doesn’t cost anything to make more small changes but going too far can be lethal to your plane. This is a hobby! Take your time, make small changes and confirm each of them to be sure all is well before takeoff.
Have a comment on this story? –Email Me!