


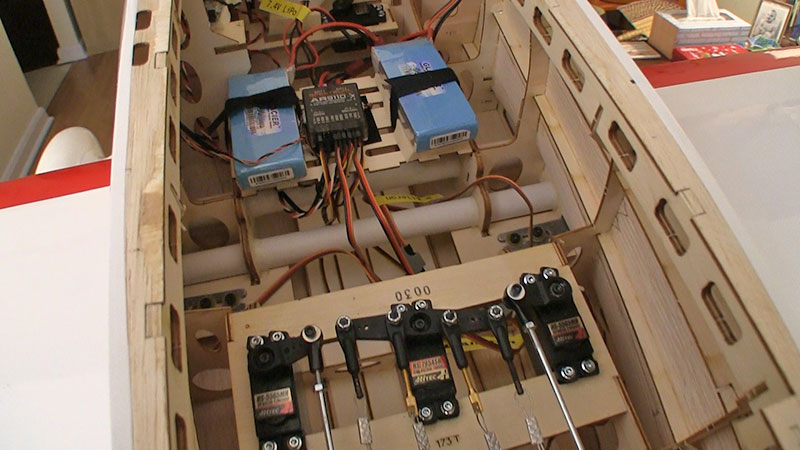
Sometimes you have enough room to do a nice, clean-looking installation. Aeroworks planes were very well
engineered in that regard.
Text, photos and video by Tom Hintz
Posted – 4-20-2019
Way too many otherwise perfectly good RC planes are compromised to some extent before they ever take to the air. I am certain of this because too many of those were my planes way back when, before I learned to stop doing that. Also, I’ve been doing trim flights for folks for over 30 years and have found many of the same mistakes in those planes as well. Veteran RC’rs will recognize much of what is covered in this story as “basics”, the importance of which became clear after crashes or near crashes caused by neglecting one or more of these points.
I can’t stress enough how important it is to follow the instructions from the kit manufacturer. They have a vested interest in the plane flying well and have figured out where the basic equipment, such as servos, is placed to make getting the CG (center of gravity) right. If the CG is wrong nothing else, we do will correct the handling problems that result from that error.
If you are new to building ARF’s or just not sure of how to best install servos see “Installing Servos” in the Resources section below. Also, when deciding what servos to use consider the kit manufacturers torque recommendations as a minimum. I always buy servos with more power than needed for the plane being built so they can be used in a wider range of planes later.
Pay attention to instruction manual photos and drawings as they will show how the servos are installed. Placing the output shaft of the servo correctly is important so the design length of the linkages is correct.
While we have extensive “tweaking” capabilities via today’s computerized transmitters we need to get the servo arms as square to the servo body as possible mechanically with the transmitter servo sub trim set to Zero. This must be done with the receiver and transmitter powered on to be sure the servo is centered.
When using a multi-arm servo arm, we can usually find one arm that will be 90-degrees to the servo body. This takes a little trial and error but the relatively fine splines on servos usually allow getting the arm 90-dgrees to the servo body.
When we cannot get the arm perfectly square to the servo body mechanically using the Sub trim setting in the transmitter can be used to get the arm 90-degrees to the servo body. Servo Sub trim is a fine adjustment, not a labor saver.
When setting servo throws it is crucial to be sure the servo is not pushing (or pulling) against a mechanical limit, called “stalling” the servo. This is how many servos burn out which can easily cost you the plane.

Sometimes we have to modify servo arms or servo
orientation to insure no servo conflict or binding.
If you cannot achieve the amount of throw needed at the control surface with the available servo travel it is time to look at longer servo arms. We can increase control surface movement by moving the linkage mounting point closer to the control surface or farther from center on the servo horn.
Some servos have a feature where it reduces the electrical current going through the servo when it stalls to help protect from burnout. On HiTec servos with this feature it is called Overload Protection. I literally set a rudder servo on fire in flight once because I failed to enable Overload Protection. I managed to save the plane and learn my lesson in that one flight.
I know, this sounds like a no-brainer but having a control surface reversed kills way too many planes every season. Add to that the number of reversed controls test pilots find prior to maiden flights and it becomes clear we need to take this seriously and check.
When assembling my planes at the field I always check the controls on the starting stand no matter how many times I have flown it. I lost one plane 30-some years ago to reversed ailerons and have been doing this pre-flight check every time I assemble a plane ever since.
After installing all needed equipment in the manufacturers-suggested layout, I set the CG (center of gravity) to the middle of the dimensions provided in the manual. We may want to change the CG later but starting where the manufacturer suggests lets us get the plane in the air and sorted out. We need a good-flying plane to make legitimate decisions on moving the CG.
I put low-tack masking tape on the wings on which I draw a line representing the CG point. I leave that tape in place through the maiden and subsequent trim flights so I can put the plane back on the balancer to check or adjust the CG accurately.
Most modern radios allow creating multiple distinct dual rate states that allow making dramatic changes to control travels in flight with a flick of a switch. More importantly, this same switch allows returning to “safe” control settings by returning it to the base position.
Before setting the control surface throws, I do the basic set up in my transmitter. First is to establish the type of model, how many servos are driving the ailerons, elevators, flaps etc. This tells us what servos go into which receiver channels." Once this is set up, I take a cell phone photo of the “Channel Assign screen to simplify plugging the servos into the correct receiver channels later.
I also do the preliminary setup of my F Modes, Dual Rates and Expo. I assign dual rates and expo to the 3-position “G” switch on my Spektrum transmitters because it is easy for me to remember and reach. Being consistent with that dual rate switch gives me an advantage if things start going wrong and I need to return to the “safe” settings quickly.
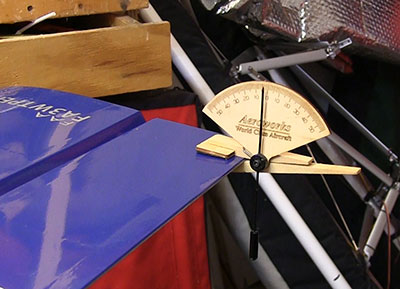
Measuring control throws is also a great time to be
sure they are moving in the right directions.
One of the nifty features of modern, multi-channel RC radio systems with a sufficient channel count is being able to have individual servos operating each elevator half and each aileron. That also means we must do more setup to get those control surfaces equal in their movements. (See Matching Elevator Halves in the Resources section below)
I use Spektrum radios (DX9 & ix12) and they include a “balance” function that allows us to prevent one elevator half from getting ahead (or behind) of the other as they go from neutral to full throw. This is an important feature because most elevator and aileron use is well below maximum throw. Taking the time to get the control surfaces balanced throughout their travel will help the plane track straighter in response to common control inputs.
The aerodynamic properties of some planes require differential, a difference in the amount of travel between up and down, particularly on ailerons. It is important to follow the manufacturers specs for throws at least initially. You may find a slightly different setup works best for you but starting with the recommendations gives you a predictable platform from which to make those decisions as you gain stick time.
Over the years I grew accustomed to flying with huge control surface throws, however that “learning curve” cost me a few planes. This is where the modern Dual Rates are such a huge help. I still set up most of my planes with all the throws that are mechanically possible but set up two more rate settings that tame things down.
The first Dual Rate switch setting (towards the rear of the transmitter) has all the throw I can get from the elevator, rudder and ailerons. The middle switch position is for the manufacturer’s suggested “high rates”. The forward-most switch position is for the suggested “low rates”.
As I get accustomed to how the plane flies, I can go back into the Dual Rates and tweak those settings to best fit the plane and my style flying it. Being able to tweak individual control surfaces in each of the switch positions allows us to get a plane set up perfectly with little danger to the plane along the way.
Caution: Starting a new plane, or one with a new throttle servo or receiver can be dangerous because we don’t know for sure what rpm the engine will go to when it starts the first time. It is also imperative to be sure the throttle servo is operating in the correct direction before flipping the engine. The plane must be well-restrained, and the assistance of a friend is also a great idea.
The throttle servo is unique in that there are no visual alignments that get us to the proper idle. The only way to know for sure that the throttle position is correct is to get the engine running and make needed adjustments to attain the desired RPM. I try to make the bulk of these adjustments mechanically but fine-tuning the idle frequently comes down to some sub-trim tweaks.
When flipping a new engine/servo combination I keep opening the throttle slightly when it starts popping. It seems that what looks like an idle position for the throttle plate seldom works. Usually the throttle must be open more than we think to keep the engine running. Once the engine is running, we can make the travel and mixture adjustments to get the engine running happily at the needed idle rpm.
It is tempting to consider a new plane to be “dialed in” after the maiden flight is accomplished safely. That is a milestone, but there is usually a good bit of tweaking needed to get the most from the airframe in both performance and predictability. It is always best to make control changes in small steps so we can quantify the changes and be able to go back to the previous settings if needed.
There are lots of happy pilots out there but precious few that did not invest some time making small changes to their planes. Stick time often reveals that a bit more or a little less control response would help the plane fly as we like.
Everybody flies a little differently which makes it important to invest some time to tweaking the setup to get the feel we want. It is even more important to take our time with the initial setup. Taking short cuts with that initial setup is a great way to fly a brand-new plane into the ground.
Have a comment on this How-To? –Email Me!